Components
COMPONENTS
ILLUSTRATION
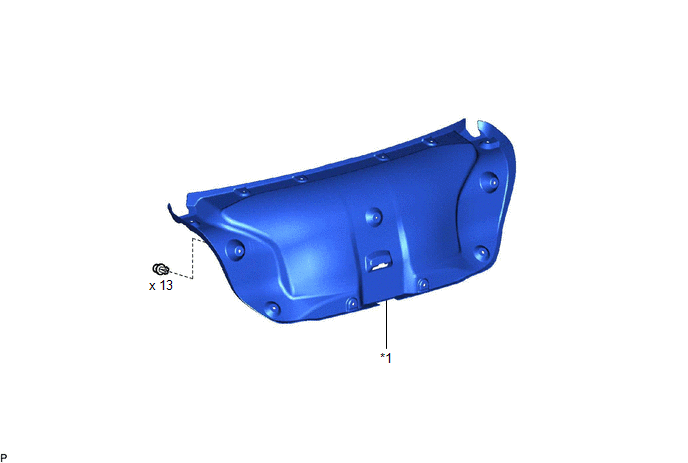
|
*1 | LUGGAGE COMPARTMENT DOOR COVER |
- | - |
ILLUSTRATION
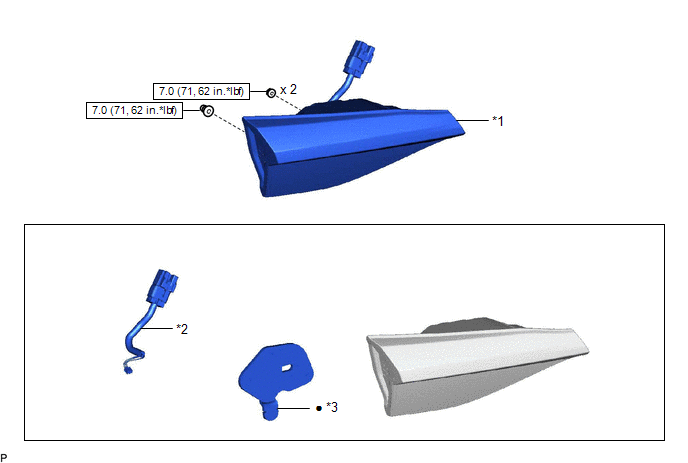
|
*1 | REAR LIGHT ASSEMBLY |
*2 | REAR LIGHT CORD |
|
*3 | REAR LIGHT GASKET |
- | - |
 |
N*m (kgf*cm, ft.*lbf): Specified torque |
â—Ź | Non-reusable part |
Disassembly
DISASSEMBLY
CAUTION / NOTICE / HINT
HINT:
- Use the same procedure for the RH side and LH side.
- The following procedure is for the LH side.
PROCEDURE
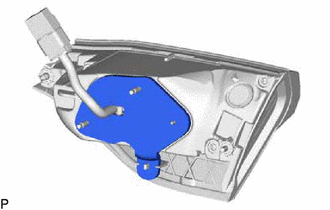
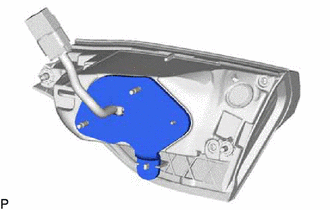
1. REMOVE REAR LIGHT GASKET
| (a) Remove the rear light gasket.
NOTICE:
- Be sure to remove all traces of the old rear light gasket from the vehicle body.
- Do not reuse the removed rear light gasket. Be sure to install a new rear light gasket to prevent water ingress.
| |
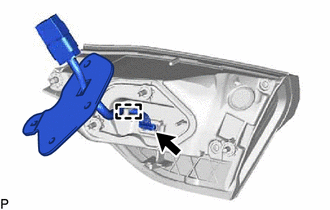
2. REMOVE REAR LIGHT CORD
| (a) Disconnect the connector to remove the rear light cord with rear light gasket. |
|
(b) Remove the rear light gasket from the rear light cord.
Inspection
INSPECTION
PROCEDURE
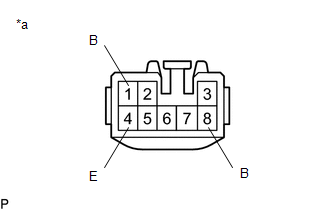
1. INSPECT REAR LIGHT ASSEMBLY LH (w/o Seaquential Turn Light)
| (a) Apply auxiliary battery voltage to the rear light assembly LH and check that the lights illuminate.
OK: |
Measurement Condition |
Specified Condition | |
Auxiliary battery positive (+) → Terminal 1 (B) Auxiliary battery negative (-) → Terminal 4 (E) |
Taillight illuminates | |
Auxiliary battery positive (+) → Terminal 8 (B) Auxiliary battery negative (-) → Terminal 4 (E) |
Back-up light illuminates | If the result is not as specified, replace the rear light assembly LH. |
 |
|
*a | Component without harness connected
(Rear Light Assembly LH) | | |
2. INSPECT REAR LIGHT ASSEMBLY RH (w/o Seaquential Turn Light)
| (a) Apply auxiliary battery voltage to the rear light assembly RH and check that the lights illuminate.
OK: |
Measurement Condition |
Specified Condition | |
Auxiliary battery positive (+) → Terminal 1 (B) Auxiliary battery negative (-) → Terminal 4 (E) |
Taillight illuminates | |
Auxiliary battery positive (+) → Terminal 8 (B) Auxiliary battery negative (-) → Terminal 4 (E) |
Back-up light illuminates | If the result is not as specified, replace the rear light assembly RH. |
 |
|
*a | Component without harness connected
(Rear Light Assembly RH) | | |
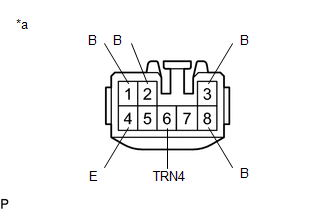
3. INSPECT REAR LIGHT ASSEMBLY LH (w/ Seaquential Turn Light)
| (a) Apply auxiliary battery voltage to the rear light assembly LH and check that the lights illuminate.
OK: |
Measurement Condition |
Specified Condition | |
Auxiliary battery positive (+) → Terminal 1 (B) Auxiliary battery negative (-) → Terminal 4 (E) |
Taillight illuminates | |
Auxiliary battery positive (+) → Terminal 2 (B) Auxiliary battery negative (-) → Terminal 4 (E) |
Stop light illuminates | |
Auxiliary battery positive (+) → Terminal 3 (B) Auxiliary battery positive (+) → Terminal 6 (TRN4)
Auxiliary battery negative (-) → Terminal 4 (E) |
Turn signal lights illuminate | |
Auxiliary battery positive (+) → Terminal 8 (B) Auxiliary battery negative (-) → Terminal 4 (E) |
Back-up light illuminates | If the result is not as specified, replace the rear light assembly LH. |
 |
|
*a | Component without harness connected
(Rear Light Assembly LH) | | |
4. INSPECT REAR LIGHT ASSEMBLY RH (w/ Seaquential Turn Light)
| (a) Apply auxiliary battery voltage to the rear light assembly RH and check that the lights illuminate.
OK: |
Measurement Condition |
Specified Condition | |
Auxiliary battery positive (+) → Terminal 1 (B) Auxiliary battery negative (-) → Terminal 4 (E) |
Taillight illuminates | |
Auxiliary battery positive (+) → Terminal 2 (B) Auxiliary battery negative (-) → Terminal 4 (E) |
Stop light illuminates | |
Auxiliary battery positive (+) → Terminal 3 (B) Auxiliary battery positive (+) → Terminal 6 (TRN4)
Auxiliary battery negative (-) → Terminal 4 (E) |
Turn signal lights illuminate | |
Auxiliary battery positive (+) → Terminal 8 (B) Auxiliary battery negative (-) → Terminal 4 (E) |
Back-up light illuminates | If the result is not as specified, replace the rear light assembly RH. |
 |
|
*a | Component without harness connected
(Rear Light Assembly RH) | | |
Installation
INSTALLATION
CAUTION / NOTICE / HINT
HINT:
- Use the same procedure for the RH side and LH side.
- The following procedure is for the LH side.
PROCEDURE
1. INSTALL REAR LIGHT ASSEMBLY
(b) Install the rear light assembly with the 3 nuts.
Torque:
7.0 N·m {71 kgf·cm, 62 in·lbf}
(c) Connect the connector.
2. INSTALL LUGGAGE COMPARTMENT DOOR COVER
Click here 
Reassembly
REASSEMBLY
CAUTION / NOTICE / HINT
HINT:
- Use the same procedure for the RH side and LH side.
- The following procedure is for the LH side.
PROCEDURE
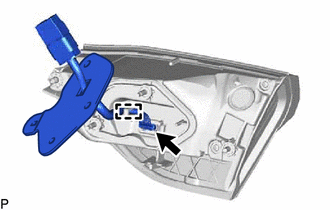
1. INSTALL REAR LIGHT CORD
| (a) Install a new rear light packing to rear light cord as shown in the illustration. |
|
(b) Engage the clamp.
(c) Connect the connector to install the rear light cord.
2. INSTALL REAR LIGHT GASKET
| (a) Install the rear light gasket. | |
Removal
REMOVAL
CAUTION / NOTICE / HINT
HINT:
- Use the same procedure for the RH side and LH side.
- The following procedure is for the LH side.
PROCEDURE
1. REMOVE LUGGAGE COMPARTMENT DOOR COVER
Click here 
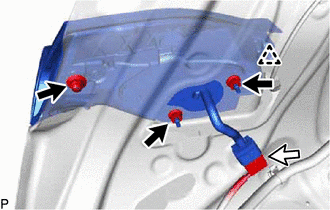
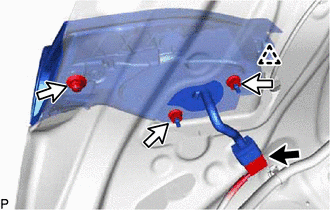
2. REMOVE REAR LIGHT ASSEMBLY
| (a) Disconnect the connector. | |
(b) Remove the 3 nuts.
(c) Disengage the clip to remove the rear light assembly.


