Components
COMPONENTS
ILLUSTRATION
|
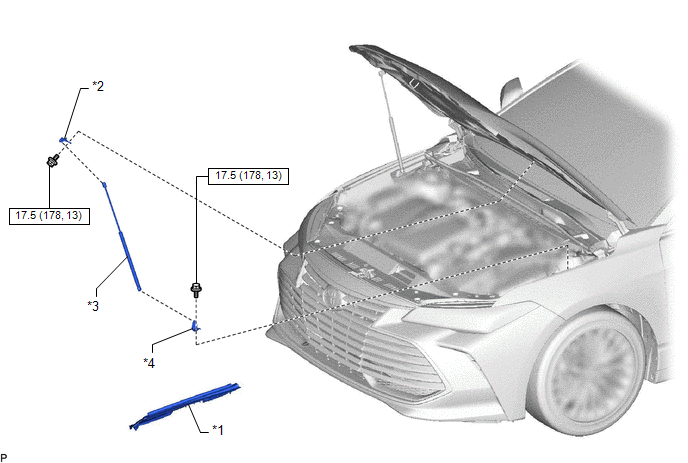
*1 | FRONT FENDER UPPER PROTECTOR |
*2 | HOOD STAY BRACKET |
|
*3 | HOOD SUPPORT ASSEMBLY |
*4 | HOOD SUPPORT BRACKET |
 |
N*m (kgf*cm, ft.*lbf): Specified torque |
- | - |
Disposal
DISPOSAL
PROCEDURE
1. DISPOSE OF HOOD SUPPORT ASSEMBLY
(a) Secure the hood support assembly horizontally in a vise with the piston rod pulled out.
| (b) Wearing safety glasses, gradually cut a part within the area (a) shown in the illustration using a metal saw to release the gas. Specification:
CAUTION: Although the gas inside the hood support assembly is colorless, odorless and harmless, metal debris may scatter. Therefore, cover hood support assembly with a piece of cloth or other material. |
|
Installation
INSTALLATION
CAUTION / NOTICE / HINT
HINT:
PROCEDURE
1. INSTALL HOOD SUPPORT BRACKET
(a) Engage the guide.
(b) Install the hood support bracket with the bolt.
Torque:
17.5 N·m {178 kgf·cm, 13 ft·lbf}
2. INSTALL FRONT FENDER UPPER PROTECTOR
(a) Engage the 4 clips to install the front fender upper protector.
3. INSTALL HOOD STAY BRACKET
(a) Engage the guide.
(b) Install the hood stay bracket with the bolt.
Torque:
17.5 N·m {178 kgf·cm, 13 ft·lbf}
4. INSTALL HOOD SUPPORT ASSEMBLY
NOTICE:
| (a) Engage the 2 ball joints to install the hood support assembly. NOTICE: Install the hood support assembly while supporting the hood by hand. |
|
(b) Check that the ball joints are engaged securely and the hood support assembly cannot be pulled off.
Removal
REMOVAL
CAUTION / NOTICE / HINT
HINT:
PROCEDURE
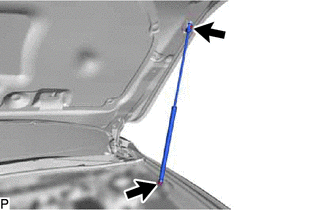
1. REMOVE HOOD SUPPORT ASSEMBLY
NOTICE:
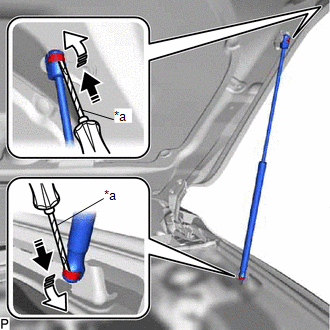
(a) Using a screwdriver with its tip wrapped with protective tape, slightly raise the 2 stop rings as shown in the illustration.
|
*a | Protective Tape |
 |
Remove in this Direction (1) |
 |
Remove in this Direction (2) |
NOTICE:
(b) Disengage the 2 ball joints to remove the hood support assembly.
NOTICE:
Remove the hood support assembly while supporting the hood sub-assembly by hand.
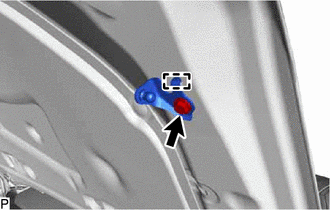
2. REMOVE HOOD STAY BRACKET
| (a) Remove the bolt. |
|
(b) Disengage the guide to remove the hood stay bracket.
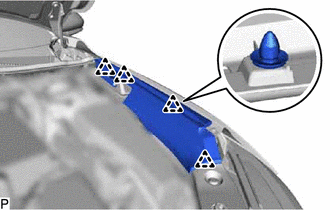
3. REMOVE FRONT FENDER UPPER PROTECTOR
| (a) Disengage the 4 clips to remove the front fender upper protector. |
|
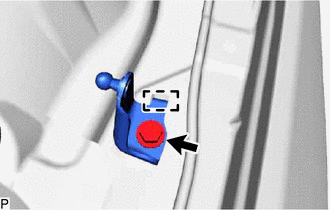
4. REMOVE HOOD SUPPORT BRACKET
| (a) Remove the bolt. |
|
(b) Disengage the guide to remove the hood support bracket.
Toyota Avalon (XX50) 2019-2022 Service & Repair Manual > P710 Hybrid Transmission / Transaxle: Shift Paddle Switch
Components COMPONENTS ILLUSTRATION *1 STEERING WHEEL ASSEMBLY *2 STEERING PAD SWITCH ASSEMBLY *3 NO. 1 TRANSMISSION SHIFT SWITCH ASSEMBLY *4 NO. 2 TRANSMISSION SHIFT SWITCH ASSEMBLY *5 SHIFT PADDLE SWITCH (TRANSMISSION SHIFT SWITCH ASSEMBLY) *6 NO. 1 SWITCH WIRE N*m (kgf*cm, ft.*lbf): Specified torq ...