Components
COMPONENTS
ILLUSTRATION
|
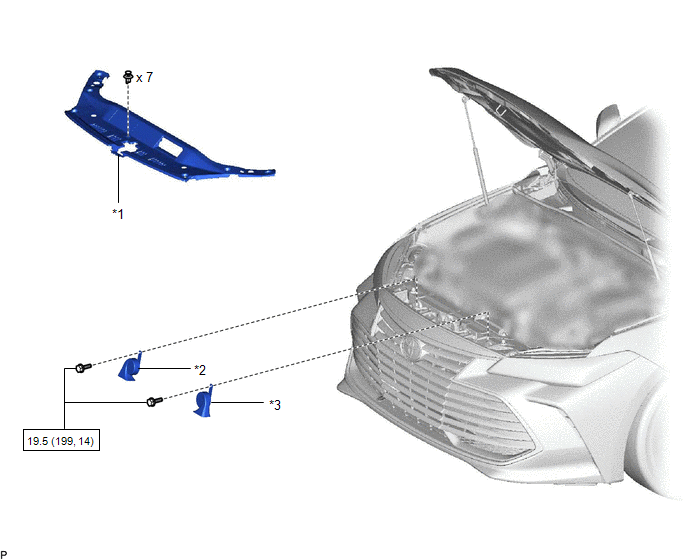
*1 | COOL AIR INTAKE DUCT SEAL |
*2 | HIGH PITCHED HORN ASSEMBLY |
|
*3 | LOW PITCHED HORN ASSEMBLY |
- | - |
 |
N*m (kgf*cm, ft.*lbf): Specified torque |
- | - |
Inspection
INSPECTION
PROCEDURE
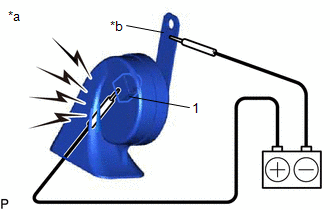
1. INSPECT HIGH PITCHED HORN ASSEMBLY
| (a) Apply auxiliary battery voltage and check the operation of the high pitched horn assembly according to the table below. OK:
If the result is not as specified, replace the high pitched horn assembly. |
|
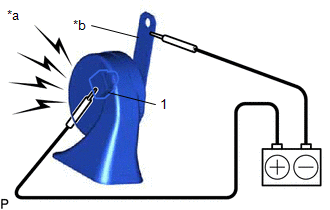
2. INSPECT LOW PITCHED HORN ASSEMBLY
| (a) Apply auxiliary battery voltage and check the operation of the low pitched horn assembly according to the table below. OK:
If the result is not as specified, replace the low pitched horn assembly. |
|
Installation
INSTALLATION
PROCEDURE
1. INSTALL LOW PITCHED HORN ASSEMBLY
(a) Connect the connector.
(b) Install the low pitched horn assembly with the bolt.
Torque:
19.5 N·m {199 kgf·cm, 14 ft·lbf}
2. INSTALL HIGH PITCHED HORN ASSEMBLY
(a) Connect the connector.
(b) Install the high pitched horn assembly with the bolt.
Torque:
19.5 N·m {199 kgf·cm, 14 ft·lbf}
3. INSTALL COOL AIR INTAKE DUCT SEAL
Click here 
Removal
REMOVAL
PROCEDURE
1. REMOVE COOL AIR INTAKE DUCT SEAL
Click here

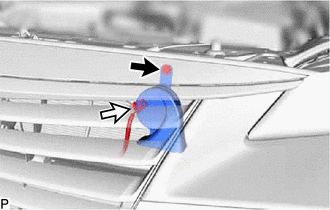
2. REMOVE HIGH PITCHED HORN ASSEMBLY
| (a) Remove the bolt. |
|
(b) Disconnect the connector to remove the high pitched horn assembly.
3. REMOVE LOW PITCHED HORN ASSEMBLY
| (a) Remove the bolt. |
|
(b) Disconnect the connector to remove the low pitched horn assembly.
Toyota Avalon (XX50) 2019-2022 Service & Repair Manual > Lighting (int): Vanity Light
ComponentsCOMPONENTS ILLUSTRATION *1 FRONT LENS HOLDER LH *2 FRONT LENS HOLDER RH *3 VANITY LIGHT BULB *4 VISOR ASSEMBLY *5 VISOR BRACKET COVER - - InspectionINSPECTION PROCEDURE 1. INSPECT VISOR ASSEMBLY LH (a) Apply auxiliary battery voltage to the visor assembly LH and check that the lights illu ...