Installation
INSTALLATION
CAUTION / NOTICE / HINT
HINT:
- Use the same procedure for the RH side and LH side.
- The following procedure is for the LH side.
PROCEDURE
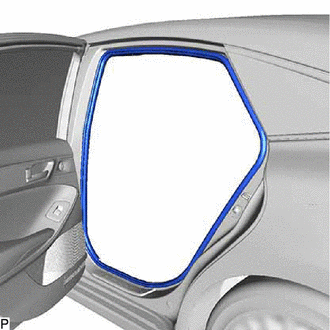
1. INSTALL REAR DOOR OPENING TRIM WEATHERSTRIP
(a)
Align the alignment mark on the rear door opening trim weatherstrip
with the flange on the vehicle body indicated by the arrow in the
illustration, and install the rear door opening trim weatherstrip.
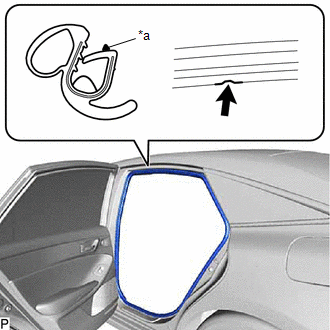
|
*a | Alignment Mark |
 |
Flange Position |
NOTICE:
- Make sure to align the alignment mark with the flange when installing
the weatherstrip. If the alignment mark is not aligned, water ingress
may occur.
- After installation, check that the corners fit correctly.
HINT:
- Make sure to install the part of the rear door opening trim weatherstrip near the alignment mark first.
- The color of the alignment marks on the rear door opening trim
weatherstrip LH and rear door opening trim weatherstrip RH are
different.
Alignment Mark:
|
Location |
Color |
|
for LH Side |
Silver |
|
for RH Side |
Orange |
2. INSTALL REAR DOOR SCUFF PLATE (for Gasoline Model)
Click here

3. INSTALL REAR DOOR SCUFF PLATE (for HV Model)
Click here 
4. INSTALL REAR SEAT CUSHION LOCK HOOK (for Gasoline Model)
Click here 
5. INSTALL REAR SEAT CUSHION ASSEMBLY (for Gasoline Model)
Click here 
6. CONNECT REAR CENTER SEAT OUTER BELT ASSEMBLY (for Gasoline Model)
Click here 
7. INSTALL LUGGAGE COMPARTMENT INNER TRIM PAD (for Gasoline Model)
w/ Seat Heater System:
Click here 
8. INSTALL SPARE WHEEL COVER ASSEMBLY (for Gasoline Model)
w/ Seat Heater System:
Click here 
Removal
REMOVAL
CAUTION / NOTICE / HINT
HINT:
- Use the same procedure for the RH side and LH side.
- The following procedure is for the LH side.
PROCEDURE
1. REMOVE SPARE WHEEL COVER ASSEMBLY (for Gasoline Model)
w/ Seat Heater System:
Click here 
2. REMOVE LUGGAGE COMPARTMENT INNER TRIM PAD (for Gasoline Model)
w/ Seat Heater System:
Click here 
3. DISCONNECT REAR CENTER SEAT OUTER BELT ASSEMBLY (for Gasoline Model)
Click here 
4. REMOVE REAR SEAT CUSHION ASSEMBLY (for Gasoline Model)
Click here 
5. REMOVE REAR SEAT CUSHION LOCK HOOK (for Gasoline Model)
Click here 
6. REMOVE REAR DOOR SCUFF PLATE (for Gasoline Model)
Click here 
7. REMOVE REAR DOOR SCUFF PLATE (for HV Model)
Click here 
8. REMOVE REAR DOOR OPENING TRIM WEATHERSTRIP
| (a) Remove the rear door opening trim weatherstrip. | |
