Customize Parameters
CUSTOMIZE PARAMETERS
CUSTOMIZE POWER MIRROR CONTROL SYSTEM (w/ Memory)
NOTICE:
- When the customer requests a change in a function, first make sure that the function can be customized.
- Record the current settings before customizing.
HINT:
The following items can be customized.
(a) Customizing with the Techstream
(1) Connect the Techstream to the DLC3.
(2) Turn the power switch on (IG).
(3) Turn the Techstream on.
(4) Enter the following menus: Customize Setting / Others.
(5) Select the setting by referring to the table below.
Others
|
Tester Display | Description |
Default | Setting |
ECU |
| Auto Fold Mirror |
Function that changes the condition under which the outer mirrors automatically retract* |
Door Lock | 01:ACC,10:Door Lock,11:OFF |
Main body ECU (Multiplex network body ECU) |
|
Reverse Coupled Actuation Mirror Angle |
Function that turns the reverse shift-linked mirror position memorization function on or off* |
User Setting | 0:Default Setting,1:User Setting |
Main body ECU (Multiplex network body ECU) |
- *: Although the item is displayed on the Techstream, it is not applicable to this vehicle.
Data List / Active Test
DATA LIST / ACTIVE TEST
DATA LIST
NOTICE:
In
the table below, the values listed under "Normal Condition" are
reference values. Do not depend solely on these reference values when
deciding whether a part is faulty or not.
HINT:
Using
the Techstream to read the Data List allows the values or states of
switches, sensors, actuators and other items to be read without removing
any parts. This non-intrusive inspection can be very useful because
intermittent conditions or signals may be discovered before parts or
wiring is disturbed. Reading the Data List information early in
troubleshooting is one way to save diagnostic time.
(a) Connect the Techstream to the DLC3.
(b) Turn the power switch on (IG).
(c) Turn the Techstream on.
(d) Enter the following menus: Body Electrical / Mirror L, Mirror R or Main Body / Data List.
(e) Read the Data List according to the display on the Techstream.
Body Electrical > Mirror L > Data List
|
Tester Display | Measurement Item |
Range | Normal Condition |
Diagnostic Note |
|
Seat Memory Switch1 | Seat memory switch M1 switch signal |
OFF or ON | OFF: Seat memory switch M1 switch off
ON: Seat memory switch M1 switch on |
- |
| Seat Memory Switch2 |
Seat memory switch M2 switch signal |
OFF or ON | OFF: Seat memory switch M2 switch off
ON: Seat memory switch M2 switch on |
- |
| Seat Memory Switch3 |
Seat memory switch M3 switch signal* |
OFF or ON | OFF: Seat memory switch M3 switch off
ON: Seat memory switch M3 switch on |
Not applicable |
|
Seat Memory Set SW | Seat memory switch SET switch signal |
OFF or ON | OFF: Seat memory switch SET switch off
ON: Seat memory switch SET switch on |
- |
| Mirror Memory No.1 |
Mirror position memorized in memory switch M1 |
OFF or ON | OFF: Not memorized
ON: Memorized | - |
|
Mirror Memory No.2 | Mirror position memorized in memory switch M2 |
OFF or ON | OFF: Not memorized
ON: Memorized | - |
|
Mirror Memory No.3 | Mirror position memorized in memory switch M3* |
OFF or ON | OFF: Not memorized
ON: Memorized | Not applicable |
|
Mirror Memory No.4 | Mirror position memorized in memory switch M4* |
OFF or ON | OFF: Not memorized
ON: Memorized | Not applicable |
|
Mirror Memory No.5 | Mirror position memorized in memory switch M5* |
OFF or ON | OFF: Not memorized
ON: Memorized | Not applicable |
|
Mirror Memory No.6 | Mirror position memorized in memory switch M6* |
OFF or ON | OFF: Not memorized
ON: Memorized | Not applicable |
|
Mirror Memory(Rev) No.1 |
Mirror reverse shift-linked position No. 1 memorized* |
OFF or ON | OFF: Not memorized
ON: Memorized | Not applicable |
|
Mirror Memory(Rev) No.2 |
Mirror reverse shift-linked position No. 2 memorized* |
OFF or ON | OFF: Not memorized
ON: Memorized | Not applicable |
|
Mirror Memory(Rev) No.3 |
Mirror reverse shift-linked position No. 3 memorized* |
OFF or ON | OFF: Not memorized
ON: Memorized | Not applicable |
|
Mirror Vertical Sensor Vol |
Vertical mirror position |
MIN: 0, MAX: 5 V | 0 to 5 V |
- |
| Mirror Horizontal Sensor Vol |
Horizontal mirror position |
MIN: 0, MAX: 5 V | 0 to 5 V |
- |
| +B Voltage Input Value |
Power supply for outer mirror control ECU assembly |
MIN: 0 V, MAX: 25.5 V | 11 to 14 V |
- |
| # Codes |
Number of trouble codes |
0 to 255 | Number of stored DTCs displayed |
- |
- *: Although the item is displayed on the Techstream, it is not applicable to this vehicle.
Body Electrical > Mirror R > Data List
|
Tester Display | Measurement Item |
Range | Normal Condition |
Diagnostic Note |
|
Seat Memory Switch1 | Seat memory switch M1 switch signal |
OFF or ON | OFF: Seat memory switch M1 switch off
ON: Seat memory switch M1 switch on |
- |
| Seat Memory Switch2 |
Seat memory switch M2 switch signal |
OFF or ON | OFF: Seat memory switch M2 switch off
ON: Seat memory switch M2 switch on |
- |
| Seat Memory Switch3 |
Seat memory switch M3 switch signal* |
OFF or ON | OFF: Seat memory switch M3 switch off
ON: Seat memory switch M3 switch on |
Not applicable |
|
Seat Memory Set SW | Seat memory switch SET switch signal |
OFF or ON | OFF: Seat memory switch SET switch off
ON: Seat memory switch SET switch on |
- |
| Mirror Memory No.1 |
Mirror position memorized in memory switch M1 |
OFF or ON | OFF: Not memorized
ON: Memorized | - |
|
Mirror Memory No.2 | Mirror position memorized in memory switch M2 |
OFF or ON | OFF: Not memorized
ON: Memorized | - |
|
Mirror Memory No.3 | Mirror position memorized in memory switch M3* |
OFF or ON | OFF: Not memorized
ON: Memorized | Not applicable |
|
Mirror Memory No.4 | Mirror position memorized in memory switch M4* |
OFF or ON | OFF: Not memorized
ON: Memorized | Not applicable |
|
Mirror Memory No.5 | Mirror position memorized in memory switch M5* |
OFF or ON | OFF: Not memorized
ON: Memorized | Not applicable |
|
Mirror Memory No.6 | Mirror position memorized in memory switch M6* |
OFF or ON | OFF: Not memorized
ON: Memorized | Not applicable |
|
Mirror Memory(Rev) No.1 |
Mirror reverse shift-linked position No. 1 memorized* |
OFF or ON | OFF: Not memorized
ON: Memorized | Not applicable |
|
Mirror Memory(Rev) No.2 |
Mirror reverse shift-linked position No. 2 memorized* |
OFF or ON | OFF: Not memorized
ON: Memorized | Not applicable |
|
Mirror Memory(Rev) No.3 |
Mirror reverse shift-linked position No. 3 memorized* |
OFF or ON | OFF: Not memorized
ON: Memorized | Not applicable |
|
Mirror Vertical Sensor Vol |
Vertical mirror position |
MIN: 0, MAX: 5 V | 0 to 5 V |
- |
| Mirror Horizontal Sensor Vol |
Horizontal mirror position |
MIN: 0, MAX: 5 V | 0 to 5 V |
- |
| +B Voltage Input Value |
Power supply for outer mirror control ECU assembly |
MIN: 0 V, MAX: 25.5 V | 11 to 14 V |
- |
| # Codes |
Number of trouble codes |
0 to 255 | Number of stored DTCs displayed |
- |
- *: Although the item is displayed on the Techstream, it is not applicable to this vehicle.
Body Electrical > Main Body > Data List
|
Tester Display | Measurement Item |
Range | Normal Condition |
Diagnostic Note |
|
Mirror Selection SW (R) |
Mirror select switch signal for RH mirror |
OFF or ON | OFF: Mirror select switch off
ON: Mirror select switch R switch on |
- |
| Mirror Selection SW (L) |
Mirror select switch signal for LH mirror |
OFF or ON | OFF: Mirror select switch off
ON: Mirror select switch L switch on |
- |
| Mirror Position SW (R) |
Mirror adjust switch signal (Right) |
OFF or ON | OFF: Mirror adjust switch not pushed right
ON: Mirror adjust switch pushed right |
Check with the mirror select switch L or R selected |
|
Mirror Position SW (L) |
Mirror adjust switch signal (Left) |
OFF or ON | OFF: Mirror adjust switch not pushed left
ON: Mirror adjust switch pushed left |
Check with the mirror select switch L or R selected |
|
Mirror Position SW (Up) |
Mirror adjust switch signal (Up) |
OFF or ON | OFF: Mirror adjust switch not pushed up
ON: Mirror adjust switch pushed up |
Check with the mirror select switch L or R selected |
|
Mirror Position SW (Dwn) |
Mirror adjust switch signal (Down) |
OFF or ON | OFF: Mirror adjust switch not pushed down
ON: Mirror adjust switch pushed down |
Check with the mirror select switch L or R selected |
|
Outer Mirror Fold SW | Retractable outer mirror switch signal* |
OFF or ON | OFF: Retractable outer mirror switch not in retract position
ON: Retractable outer mirror switch in retract position |
Not applicable |
|
Auto Mirror SW | Retractable outer mirror switch signal* |
OFF or ON | OFF: Retractable outer mirror switch not in auto position
ON: Retractable outer mirror switch in auto position |
Not applicable |
|
Auto Fold Mirror | Function that changes the condition under which the outer mirrors automatically retract state* |
ACC, Door Lock or OFF | Customize setting displayed |
Not applicable |
|
Reverse Coupled Actuation Mirror Angle |
Function that turns the reverse shift-linked mirror position memorization function state* |
Default Setting or User Setting |
Customize setting displayed |
Not applicable |
|
Mem SW No. w/KeyID1 | Switch linked with key ID1 |
NONE, MEM SW1, MEM SW2, or MEM SW3* |
NONE: No switches linked with key ID1 MEM SW1: M1 linked with key ID1
MEM SW2: M2 linked with key ID1 MEM SW3: M3 linked with key ID1* |
- |
| Mem SW No. w/KeyID2 |
Switch linked with key ID2 |
NONE, MEM SW1, MEM SW2, or MEM SW3* |
NONE: No switches linked with key ID2 MEM SW1: M1 linked with key ID2
MEM SW2: M2 linked with key ID2 MEM SW3: M3 linked with key ID2* |
- |
| Mem SW No. w/KeyID3 |
Switch linked with key ID3 |
NONE, MEM SW1, MEM SW2, or MEM SW3* |
NONE: No switches linked with key ID3 MEM SW1: M1 linked with key ID3
MEM SW2: M2 linked with key ID3 MEM SW3: M3 linked with key ID3* |
- |
| Mem SW No. w/KeyID4 |
Switch linked with key ID4 |
NONE, MEM SW1, MEM SW2, or MEM SW3* |
NONE: No switches linked with key ID4 MEM SW1: M1 linked with key ID4
MEM SW2: M2 linked with key ID4 MEM SW3: M3 linked with key ID4* |
- |
| Mem SW No. w/KeyID5 |
Switch linked with key ID5 |
NONE, MEM SW1, MEM SW2, or MEM SW3* |
NONE: No switches linked with key ID5 MEM SW1: M1 linked with key ID5
MEM SW2: M2 linked with key ID5 MEM SW3: M3 linked with key ID5* |
- |
| Mem SW No. w/KeyID6 |
Switch linked with key ID6 |
NONE, MEM SW1, MEM SW2, or MEM SW3* |
NONE: No switches linked with key ID6 MEM SW1: M1 linked with key ID6
MEM SW2: M2 linked with key ID6 MEM SW3: M3 linked with key ID6* |
- |
| Mem SW No. w/KeyID7 |
Switch linked with key ID7 |
NONE, MEM SW1, MEM SW2, or MEM SW3* |
NONE: No switches linked with key ID7 MEM SW1: M1 linked with key ID7
MEM SW2: M2 linked with key ID7 MEM SW3: M3 linked with key ID7* |
- |
| Driver Seat Memory1 |
Seat position memorized with M1 switch |
ON or OFF | ON: Memorized
OFF: Not memorized | - |
|
Driver Seat Memory2 | Seat position memorized with M2 switch |
ON or OFF | ON: Memorized
OFF: Not memorized | - |
|
Driver Seat Memory3 | Seat position memorized with M3 switch* |
ON or OFF | ON: Memorized
OFF: Not memorized | Not applicable |
- *: Although the item is displayed on the Techstream, it is not applicable to this vehicle.
ACTIVE TEST
HINT:
Using
the Techstream to perform Active Tests allows relays, VSVs, actuators
and other items to be operated without removing any parts. This
non-intrusive functional inspection can be very useful because
intermittent operation may be discovered before parts or wiring is
disturbed. Performing Active Tests early in troubleshooting is one way
to save diagnostic time. Data List information can be displayed while
performing Active Tests.
(a) Connect the Techstream to the DLC3.
(b) Turn the power switch on (IG).
(c) Turn the Techstream on.
(d) Enter the following menus: Body Electrical / Mirror L or Mirror R / Active Test.
(e) Perform the Active Test according to the display on the Techstream.
Body Electrical > Mirror L > Active Test
|
Tester Display | Measurement Item |
Control Range | Diagnostic Note |
|
Mirror Up/Down | Mirror vertical operation |
OFF, Down or Up |
- Operate with power switch on (IG) and the vehicle stopped.
- This test tilts the mirror up or down.
- This operation can be confirmed by watching the mirror move in the desired direction.
|
| Mirror Right/Left |
Mirror horizontal operation |
OFF, Right or Left |
- Operate with power switch on (IG) and the vehicle stopped.
- This test tilts the mirror right or left.
- This operation can be confirmed by watching the mirror move in the desired direction.
|
| Mirror Fold/Return |
Mirror retract operation* |
OFF, Return or Fold | Not applicable |
|
Mirror Heater | Mirror heater operation |
OFF or ON |
- Operate with power switch on (IG) and the vehicle stopped.
- This test turns the mirror heater on or off.
- Mirror heater operation can be confirmed by touch.
|
- *: Although the item is displayed on the Techstream, it is not applicable to this vehicle.
Body Electrical > Mirror R > Active Test
|
Tester Display | Measurement Item |
Control Range | Diagnostic Note |
|
Mirror Up/Down | Mirror vertical operation |
OFF, Down or Up |
- Operate with power switch on (IG) and the vehicle stopped.
- This test tilts the mirror up or down.
- This operation can be confirmed by watching the mirror move in the desired direction.
|
| Mirror Right/Left |
Mirror horizontal operation |
OFF, Right or Left |
- Operate with power switch on (IG) and the vehicle stopped.
- This test tilts the mirror right or left.
- This operation can be confirmed by watching the mirror move in the desired direction.
|
| Mirror Fold/Return |
Mirror retract operation* |
OFF, Return or Fold | Not applicable |
|
Mirror Heater | Mirror heater operation |
OFF or ON |
- Operate with power switch on (IG) and the vehicle stopped.
- This test turns the mirror heater on or off.
- Mirror heater operation can be confirmed by touch.
|
- *: Although the item is displayed on the Techstream, it is not applicable to this vehicle.
Diagnosis System
DIAGNOSIS SYSTEM
CHECK DLC3
(a) Check the DLC3.
Click here 
INSPECT AUXILIARY BATTERY VOLTAGE
(a) Measure the auxiliary battery voltage with the power switch off.
Standard Voltage:
11 to 14 V
If the voltage is below 11 V, recharge or replace the auxiliary battery.
Diagnostic Trouble Code Chart
DIAGNOSTIC TROUBLE CODE CHART
Power Mirror Control System (w/ Memory) |
DTC No. | Detection Item |
Link |
| U0142 |
Lost Communication with Main Body ECU |
 |
Driver Side Power Mirror cannot be Adjusted with Power Mirror Switch
DESCRIPTION
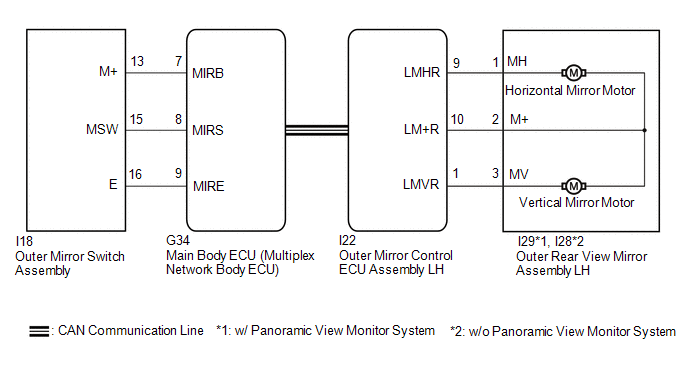
The outer
mirror switch assembly sends the mirror adjust switch signals to the
main body ECU (multiplex network body ECU). The main body ECU (multiplex
network body ECU) then sends the received mirror adjust switch signals
to the outer mirror control ECU assembly LH via CAN communication. On
receiving the signal, the outer mirror control ECU assembly LH operates
the vertical and horizontal mirror motors, which are built into the
outer rear view mirror assembly LH, to adjust the mirror surface
position.
WIRING DIAGRAM
CAUTION / NOTICE / HINT
NOTICE:
- The power mirror control system (w/ Memory) uses the CAN communication
system. Inspect the communication functions by following How to Proceed
with Troubleshooting. Troubleshoot the power mirror control system (w/
Memory) after confirming that the communication systems are functioning
properly.
Click here 
- Before replacing the main body ECU (multiplex network body ECU), refer to Registration.
Click here 
PROCEDURE
|
1. | READ VALUE USING TECHSTREAM |
(a) Connect the Techstream to the DLC3.
(b) Turn the power switch on (IG).
(c) Turn the Techstream on.
(d) Enter the following menus: Body Electrical / Main Body / Data List.
(e) Read the Data List according to the display on the Techstream.
Body Electrical > Main Body > Data List
|
Tester Display | Measurement Item |
Range | Normal Condition |
Diagnostic Note |
|
Mirror Selection SW (R) |
Mirror select switch signal for RH mirror |
OFF or ON | OFF: Mirror select switch off
ON: Mirror select switch R switch on |
- |
| Mirror Selection SW (L) |
Mirror select switch signal for LH mirror |
OFF or ON | OFF: Mirror select switch off
ON: Mirror select switch L switch on |
- |
| Mirror Position SW (R) |
Mirror adjust switch signal (Right) |
OFF or ON | OFF: Mirror adjust switch not pushed right
ON: Mirror adjust switch pushed right |
Check with the mirror select switch L or R selected |
|
Mirror Position SW (L) |
Mirror adjust switch signal (Left) |
OFF or ON | OFF: Mirror adjust switch not pushed left
ON: Mirror adjust switch pushed left |
Check with the mirror select switch L or R selected |
|
Mirror Position SW (Up) |
Mirror adjust switch signal (Up) |
OFF or ON | OFF: Mirror adjust switch not pushed up
ON: Mirror adjust switch pushed up |
Check with the mirror select switch L or R selected |
|
Mirror Position SW (Dwn) |
Mirror adjust switch signal (Down) |
OFF or ON | OFF: Mirror adjust switch not pushed down
ON: Mirror adjust switch pushed down |
Check with the mirror select switch L or R selected |
Body Electrical > Main Body > Data List
|
Tester Display |
| Mirror Selection SW (R) |
|
Mirror Selection SW (L) |
|
Mirror Position SW (R) |
|
Mirror Position SW (L) |
|
Mirror Position SW (Up) |
|
Mirror Position SW (Dwn) |
OK:
On the Techstream screen, ON or OFF is displayed accordingly.
| NG |
 | GO TO STEP 4 |
|
OK |
 | |
| 2. |
INSPECT OUTER REAR VIEW MIRROR ASSEMBLY LH (MIRROR SURFACE) |
(a) Remove the outer rear view mirror assembly LH.
Click here

(b) Inspect the outer rear view mirror assembly LH (mirror surface).
Click here 
| NG |
 | REPLACE OUTER REAR VIEW MIRROR ASSEMBLY LH |
|
OK |
 | |
| 3. |
CHECK HARNESS AND CONNECTOR (OUTER REAR VIEW MIRROR ASSEMBLY LH - OUTER MIRROR CONTROL ECU ASSEMBLY LH) |
(a) Disconnect the I29*1 or I28*2 outer rear view mirror assembly LH.
- *1: w/ Panoramic View Monitor System
- *2: w/o Panoramic View Monitor System
(b) Disconnect the I22 outer mirror control ECU assembly LH.
(c) Measure the resistance according to the value(s) in the table below.
Standard Resistance:
w/ Panoramic View Monitor System |
Tester Connection | Condition |
Specified Condition |
|
I29-3 (MV) - I22-1 (LMVR) |
Always | Below 1 Ω |
|
I29-1 (MH) - I22-9 (LMHR) |
Always | Below 1 Ω |
|
I29-2 (M+) - I22-10 (LM+R) |
Always | Below 1 Ω |
|
I29-3 (MV) or I22-1 (LMVR) - Body ground |
Always | 10 kΩ or higher |
|
I29-1 (MH) or I22-9 (LMHR) - Body ground |
Always | 10 kΩ or higher |
|
I29-2 (M+) or I22-10 (LM+R) - Body ground |
Always | 10 kΩ or higher |
w/o Panoramic View Monitor System |
Tester Connection | Condition |
Specified Condition |
|
I28-3 (MV) - I22-1 (LMVR) |
Always | Below 1 Ω |
|
I28-1 (MH) - I22-9 (LMHR) |
Always | Below 1 Ω |
|
I28-2 (M+) - I22-10 (LM+R) |
Always | Below 1 Ω |
|
I28-3 (MV) or I22-1 (LMVR) - Body ground |
Always | 10 kΩ or higher |
|
I28-1 (MH) or I22-9 (LMHR) - Body ground |
Always | 10 kΩ or higher |
|
I28-2 (M+) or I22-10 (LM+R) - Body ground |
Always | 10 kΩ or higher |
| OK |
 | REPLACE OUTER MIRROR CONTROL ECU ASSEMBLY LH |
| NG |
 | REPAIR OR REPLACE HARNESS OR CONNECTOR |
| 4. |
INSPECT OUTER MIRROR SWITCH ASSEMBLY |
(a) Remove the outer mirror switch assembly.
Click here 
(b) Inspect the outer mirror switch assembly.
Click here 
| NG |
 | REPLACE OUTER MIRROR SWITCH ASSEMBLY |
|
OK |
 | |
| 5. |
CHECK HARNESS AND CONNECTOR (OUTER MIRROR SWITCH ASSEMBLY - MAIN BODY ECU (MULTIPLEX NETWORK BODY ECU)) |
(a) Disconnect the I18 outer mirror switch assembly.
(b) Disconnect the G34 main body ECU (multiplex network body ECU).
(c) Measure the resistance according to the value(s) in the table below.
Standard Resistance:
|
Tester Connection | Condition |
Specified Condition |
|
I18-16 (E) - G34-9 (MIRE) |
Always | Below 1 Ω |
|
I18-13 (M+) - G34-7 (MIRB) |
Always | Below 1 Ω |
|
I18-15 (MSW) - G34-8 (MIRS) |
Always | Below 1 Ω |
|
I18-16 (E) or G34-9 (MIRE) - Body ground |
Always | 10 kΩ or higher |
|
I18-13 (M+) or G34-7 (MIRB) - Body ground |
Always | 10 kΩ or higher |
|
I18-15 (MSW) or G34-8 (MIRS) - Body ground |
Always | 10 kΩ or higher |
| OK |
 | REPLACE MAIN BODY ECU (MULTIPLEX NETWORK BODY ECU) |
| NG |
 | REPAIR OR REPLACE HARNESS OR CONNECTOR |
Dtc Check / Clear
DTC CHECK / CLEAR
CHECK DTC
(a) Connect the Techstream to the DLC3.
(b) Turn the power switch on (IG).
(c) Turn the Techstream on.
(d) Enter the following menus: Body Electrical / Mirror L or Mirror R / Trouble Codes.
Body Electrical > Mirror L > Trouble Codes Body Electrical > Mirror R > Trouble Codes
(e) Check the details of the DTCs.
Click here

CLEAR DTC
(a) Connect the Techstream to the DLC3.
(b) Turn the power switch on (IG).
(c) Turn the Techstream on.
(d) Enter the following menus: Body Electrical / Mirror L or Mirror R / Trouble Codes.
Body Electrical > Mirror L > Clear DTCs Body Electrical > Mirror R > Clear DTCs
(e) Clear the DTCs.
Front Passenger Side Power Mirror cannot be Adjusted with Power Mirror Switch
DESCRIPTION
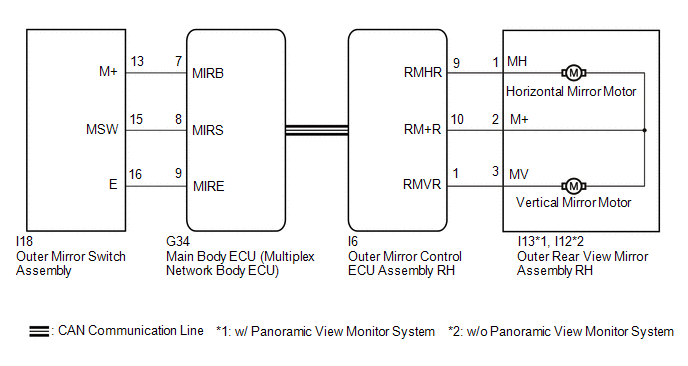
The outer
mirror switch assembly sends the mirror adjust switch signals to the
main body ECU (multiplex network body ECU). The main body ECU (multiplex
network body ECU) then sends the received mirror adjust switch signals
to the outer mirror control ECU assembly RH via CAN communication. On
receiving the signal, the outer mirror control ECU assembly RH operates
the vertical and horizontal mirror motors, which are built into the
outer rear view mirror assembly RH, to adjust the mirror surface
position.
WIRING DIAGRAM
CAUTION / NOTICE / HINT
NOTICE:
- The power mirror control system (w/ Memory) uses the CAN communication
system. Inspect the communication functions by following How to Proceed
with Troubleshooting. Troubleshoot the power mirror control system (w/
Memory) after confirming that the communication systems are functioning
properly.
Click here 
- Before replacing the main body ECU (multiplex network body ECU), refer to Registration.
Click here 
PROCEDURE
|
1. | READ VALUE USING TECHSTREAM |
(a) Connect the Techstream to the DLC3.
(b) Turn the power switch on (IG).
(c) Turn the Techstream on.
(d) Enter the following menus: Body Electrical / Main Body / Data List.
(e) Read the Data List according to the display on the Techstream.
Body Electrical > Main Body > Data List
|
Tester Display | Measurement Item |
Range | Normal Condition |
Diagnostic Note |
|
Mirror Selection SW (R) |
Mirror select switch signal for RH mirror |
OFF or ON | OFF: Mirror select switch off
ON: Mirror select switch R switch on |
- |
| Mirror Selection SW (L) |
Mirror select switch signal for LH mirror |
OFF or ON | OFF: Mirror select switch off
ON: Mirror select switch L switch on |
- |
| Mirror Position SW (R) |
Mirror adjust switch signal (Right) |
OFF or ON | OFF: Mirror adjust switch not pushed right
ON: Mirror adjust switch pushed right |
Check with the mirror select switch L or R selected |
|
Mirror Position SW (L) |
Mirror adjust switch signal (Left) |
OFF or ON | OFF: Mirror adjust switch not pushed left
ON: Mirror adjust switch pushed left |
Check with the mirror select switch L or R selected |
|
Mirror Position SW (Up) |
Mirror adjust switch signal (Up) |
OFF or ON | OFF: Mirror adjust switch not pushed up
ON: Mirror adjust switch pushed up |
Check with the mirror select switch L or R selected |
|
Mirror Position SW (Dwn) |
Mirror adjust switch signal (Down) |
OFF or ON | OFF: Mirror adjust switch not pushed down
ON: Mirror adjust switch pushed down |
Check with the mirror select switch L or R selected |
Body Electrical > Main Body > Data List
|
Tester Display |
| Mirror Selection SW (R) |
|
Mirror Selection SW (L) |
|
Mirror Position SW (R) |
|
Mirror Position SW (L) |
|
Mirror Position SW (Up) |
|
Mirror Position SW (Dwn) |
OK:
On the Techstream screen, ON or OFF is displayed accordingly.
| NG |
 | GO TO STEP 4 |
|
OK |
 | |
| 2. |
INSPECT OUTER REAR VIEW MIRROR ASSEMBLY RH (MIRROR SURFACE) |
(a) Remove the outer rear view mirror assembly RH.
Click here

(b) Inspect the outer rear view mirror assembly RH (mirror surface).
Click here 
| NG |
 | REPLACE OUTER REAR VIEW MIRROR ASSEMBLY RH |
|
OK |
 | |
| 3. |
CHECK HARNESS AND CONNECTOR (OUTER REAR VIEW MIRROR ASSEMBLY RH - OUTER MIRROR CONTROL ECU ASSEMBLY RH) |
(a) Disconnect the I13*1 or I12*2 outer rear view mirror assembly RH.
- *1: w/ Panoramic View Monitor System
- *2: w/o Panoramic View Monitor System
(b) Disconnect the I6 outer mirror control ECU assembly RH.
(c) Measure the resistance according to the value(s) in the table below.
Standard Resistance:
w/ Panoramic View Monitor System |
Tester Connection | Condition |
Specified Condition |
|
I13-3 (MV) - I6-1 (RMVR) |
Always | Below 1 Ω |
|
I13-1 (MH) - I6-9 (RMHR) |
Always | Below 1 Ω |
|
I13-2 (M+) - I6-10 (RM+R) |
Always | Below 1 Ω |
|
I13-3 (MV) or I6-1 (RMVR) - Body ground |
Always | 10 kΩ or higher |
|
I13-1 (MH) or I6-9 (RMHR) - Body ground |
Always | 10 kΩ or higher |
|
I13-2 (M+) or I6-10 (RM+R) - Body ground |
Always | 10 kΩ or higher |
w/o Panoramic View Monitor System |
Tester Connection | Condition |
Specified Condition |
|
I12-3 (MV) - I6-1 (RMVR) |
Always | Below 1 Ω |
|
I12-1 (MH) - I6-9 (RMHR) |
Always | Below 1 Ω |
|
I12-2 (M+) - I6-10 (RM+R) |
Always | Below 1 Ω |
|
I12-3 (MV) or I6-1 (RMVR) - Body ground |
Always | 10 kΩ or higher |
|
I12-1 (MH) or I6-9 (RMHR) - Body ground |
Always | 10 kΩ or higher |
|
I12-2 (M+) or I6-10 (RM+R) - Body ground |
Always | 10 kΩ or higher |
| OK |
 | REPLACE OUTER MIRROR CONTROL ECU ASSEMBLY RH |
| NG |
 | REPAIR OR REPLACE HARNESS OR CONNECTOR |
| 4. |
INSPECT OUTER MIRROR SWITCH ASSEMBLY |
(a) Remove the outer mirror switch assembly.
Click here 
(b) Inspect the outer mirror switch assembly.
Click here 
| NG |
 | REPLACE OUTER MIRROR SWITCH ASSEMBLY |
|
OK |
 | |
| 5. |
CHECK HARNESS AND CONNECTOR (OUTER MIRROR SWITCH ASSEMBLY - MAIN BODY ECU (MULTIPLEX NETWORK BODY ECU)) |
(a) Disconnect the I18 outer mirror switch assembly.
(b) Disconnect the G34 main body ECU (multiplex network body ECU).
(c) Measure the resistance according to the value(s) in the table below.
Standard Resistance:
|
Tester Connection | Condition |
Specified Condition |
|
I18-16 (E) - G34-9 (MIRE) |
Always | Below 1 Ω |
|
I18-13 (M+) - G34-7 (MIRB) |
Always | Below 1 Ω |
|
I18-15 (MSW) - G34-8 (MIRS) |
Always | Below 1 Ω |
|
I18-16 (E) or G34-9 (MIRE) - Body ground |
Always | 10 kΩ or higher |
|
I18-13 (M+) or G34-7 (MIRB) - Body ground |
Always | 10 kΩ or higher |
|
I18-15 (MSW) or G34-8 (MIRS) - Body ground |
Always | 10 kΩ or higher |
| OK |
 | REPLACE MAIN BODY ECU (MULTIPLEX NETWORK BODY ECU) |
| NG |
 | REPAIR OR REPLACE HARNESS OR CONNECTOR |
How To Proceed With Troubleshooting
CAUTION / NOTICE / HINT
HINT:
- Use the following procedure to troubleshoot the power mirror control system (w/ Memory).
- *: Use the Techstream.
PROCEDURE
|
1. | VEHICLE BROUGHT TO WORKSHOP |
|
NEXT |
 | |
| 2. |
CUSTOMER PROBLEM ANALYSIS |
HINT:
- In troubleshooting, confirm that the problem symptoms have been
accurately identified. Preconceptions should be discarded in order to
make an accurate judgment. To clearly understand what the problem
symptoms are, it is extremely important to ask the customer about the
problem and the conditions at the time the malfunction occurred.
- Gather as much information as possible for reference. Past problems that seem unrelated may also help in some cases.
- The following 5 items are important points for problem analysis:
|
What |
Vehicle model, system name |
|
When |
Date, time, occurrence frequency |
|
Where |
Road conditions |
|
Under what conditions? |
Driving conditions, weather conditions |
|
How did it happen? |
Problem symptoms |
|
NEXT |
 | |
(a) Measure the auxiliary battery voltage with the power switch off.
Standard Voltage:
11 to 14 V
If the voltage is below 11 V, recharge or replace the auxiliary battery before proceeding to the next step.
(b) Check the fuses and relays.
(c)
Check the connector connections and terminals to make sure that there
are no abnormalities such as loose connections, deformation, etc.
|
NEXT |
 | |
| 4. |
CHECK COMMUNICATION FUNCTION OF CAN COMMUNICATION SYSTEM* |
(a) Using the Techstream, check for CAN communication system DTCs.
Click here

|
Result | Proceed to |
|
CAN DTCs are not output |
A |
| CAN DTCs are output |
B |
| B |
 | GO TO CAN COMMUNICATION SYSTEM |
|
A |
 | |
| 5. |
PROBLEM SYMPTOMS TABLE |
(a) Refer to Problem Symptoms Table.
Click here 
|
Result | Proceed to |
|
Fault is not listed in Problem Symptoms Table |
A |
| Fault is listed in Problem Symptoms Table |
B |
| B |
 | GO TO STEP 7 |
|
A |
 | |
| 6. |
OVERALL ANALYSIS AND TROUBLESHOOTING* |
(a) Operation Check
Click here 
(b) Terminals of ECU
Click here 
(c) Data List / Active Test
Click here 
(d) Inspection
|
NEXT |
 | |
|
NEXT |
 | |
| NEXT |
 | END |
Mirror Heater does not Operate with Rear Defogger Switch
DESCRIPTION
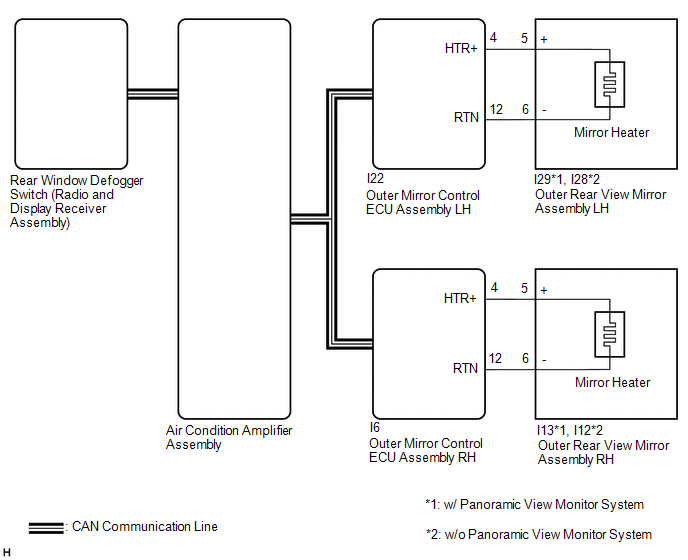
When the mirror
heater switch (rear window defogger switch) is operated, the mirror
heater signal is sent to the air conditioning amplifier assembly and
then to each outer mirror control ECU assembly via CAN communication.
Based on this signal, the outer mirror control ECU assemblies operate
the mirror heaters.
WIRING DIAGRAM
CAUTION / NOTICE / HINT
NOTICE:
- The power mirror control system (w/ Memory) uses the CAN communication
system. Inspect the communication functions by following How to Proceed
with Troubleshooting. Troubleshoot the power mirror control system (w/
Memory) after confirming that the communication systems are functioning
properly.
Click here 
- If the auxiliary battery voltage is low, the mirror heater function may not operate.
PROCEDURE
|
1. | CHECK WINDOW DEFOGGER SYSTEM |
(a) Check window defogger system operation.
Click here

OK:
Window defogger system is normal.
| NG |
 | GO TO WINDOW DEFOGGER SYSTEM |
|
OK |
 | |
| 2. |
PERFORM ACTIVE TEST USING TECHSTREAM |
(a) Connect the Techstream to the DLC3.
(b) Turn the power switch on (IG).
(c) Turn the Techstream on.
(d) Enter the following menus: Body Electrical / Mirror L or Mirror R / Active Test.
(e) Perform an Active Test according to the display on the Techstream.
Body Electrical > Mirror L > Active Test
|
Tester Display | Measurement Item |
Control Range | Diagnostic Note |
|
Mirror Heater | Mirror heater operation |
OFF or ON |
- Operate with power switch on (IG) and the vehicle stopped.
- This test turns the mirror heater on or off.
- Mirror heater operation can be confirmed by touch.
|
Body Electrical > Mirror L > Active Test
|
Tester Display |
| Mirror Heater |
Body Electrical > Mirror R > Active Test
|
Tester Display | Measurement Item |
Control Range | Diagnostic Note |
|
Mirror Heater | Mirror heater operation |
OFF or ON |
- Operate with power switch on (IG) and the vehicle stopped.
- This test turns the mirror heater on or off.
- Mirror heater operation can be confirmed by touch.
|
Body Electrical > Mirror R > Active Test
|
Tester Display |
| Mirror Heater |
|
Result | Proceed to |
|
Mirror heater operation on both mirrors is normal |
A |
| Mirror heater operation on driver door mirror is not normal |
B |
| Mirror heater operation on front passenger door mirror is not normal |
C |
| A |
 | REPLACE AIR CONDITIONING AMPLIFIER ASSEMBLY |
| C |
 | GO TO STEP 6 |
|
B |
 | |
| 3. |
CHECK HARNESS AND CONNECTOR (OUTER MIRROR CONTROL ECU ASSEMBLY LH - OUTER REAR VIEW MIRROR ASSEMBLY LH) |
(a) Disconnect the I22 outer mirror control ECU assembly LH connector.
(b) Disconnect the I29*1 or I28*2 outer rear view mirror assembly LH connector.
- *1: w/ Panoramic View Monitor System
- *2: w/o Panoramic View Monitor System
(c) Measure the resistance according to the value(s) in the table below.
Standard Resistance:
w/ Panoramic View Monitor System |
Tester Connection | Condition |
Specified Condition |
|
I22-4 (HTR+) - I29-5 (+) |
Always | Below 1 Ω |
|
I22-12 (RTN) - I29-6 (-) |
Always | Below 1 Ω |
|
I22-4 (HTR+) or I29-5 (+) - Body ground |
Always | 10 kΩ or higher |
|
I22-12 (RTN) or I29-6 (-) - Body ground |
Always | 10 kΩ or higher |
w/o Panoramic View Monitor System |
Tester Connection | Condition |
Specified Condition |
|
I22-4 (HTR+) - I28-5 (+) |
Always | Below 1 Ω |
|
I22-12 (RTN) - I28-6 (-) |
Always | Below 1 Ω |
|
I22-4 (HTR+) or I28-5 (+) - Body ground |
Always | 10 kΩ or higher |
|
I22-12 (RTN) or I28-6 (-) - Body ground |
Always | 10 kΩ or higher |
| NG |
 | REPAIR OR REPLACE HARNESS OR CONNECTOR |
|
OK |
 | |
| 4. |
INSPECT OUTER MIRROR LH |
(a) Remove the outer mirror LH.
Click here 
(b) Inspect the outer mirror LH.
Click here 
| NG |
 | REPLACE OUTER MIRROR LH |
|
OK |
 | |
| 5. |
INSPECT OUTER REAR VIEW MIRROR ASSEMBLY LH (MIRROR HEATER) |
(a) Remove the outer rear view mirror assembly LH.
Click here

(b) Inspect the outer rear view mirror assembly LH (mirror heater).
Click here 
| OK |
 | REPLACE OUTER MIRROR CONTROL ECU ASSEMBLY LH |
| NG |
 | REPLACE OUTER REAR VIEW MIRROR ASSEMBLY LH |
| 6. |
CHECK HARNESS AND CONNECTOR (OUTER MIRROR CONTROL ECU ASSEMBLY RH - OUTER REAR VIEW MIRROR ASSEMBLY RH) |
(a) Disconnect the I6 outer mirror control ECU assembly RH connector.
(b) Disconnect the I13*1 or I12*2 outer rear view mirror assembly RH connector.
- *1: w/ Panoramic View Monitor System
- *2: w/o Panoramic View Monitor System
(c) Measure the resistance according to the value(s) in the table below.
Standard Resistance:
w/ Panoramic View Monitor System |
Tester Connection | Condition |
Specified Condition |
|
I6-4 (HTR+) - I13-5 (+) |
Always | Below 1 Ω |
|
I6-12 (RTN) - I13-6 (-) |
Always | Below 1 Ω |
|
I6-4 (HTR+) or I13-5 (+) - Body ground |
Always | 10 kΩ or higher |
|
I6-12 (RTN) or I13-6 (-) - Body ground |
Always | 10 kΩ or higher |
w/o Panoramic View Monitor System |
Tester Connection | Condition |
Specified Condition |
|
I6-4 (HTR+) - I12-5 (+) |
Always | Below 1 Ω |
|
I6-12 (RTN) - I12-6 (-) |
Always | Below 1 Ω |
|
I6-4 (HTR+) or I12-5 (+) - Body ground |
Always | 10 kΩ or higher |
|
I6-12 (RTN) or I12-6 (-) - Body ground |
Always | 10 kΩ or higher |
| NG |
 | REPAIR OR REPLACE HARNESS OR CONNECTOR |
|
OK |
 | |
| 7. |
INSPECT OUTER MIRROR RH |
(a) Remove the outer mirror RH.
Click here 
(b) Inspect the outer mirror RH.
Click here 
| NG |
 | REPLACE OUTER MIRROR RH |
|
OK |
 | |
| 8. |
INSPECT OUTER REAR VIEW MIRROR ASSEMBLY RH (MIRROR HEATER) |
(a) Remove the outer rear view mirror assembly RH.
Click here

(b) Inspect the outer rear view mirror assembly RH (mirror heater).
Click here 
| OK |
 | REPLACE OUTER MIRROR CONTROL ECU ASSEMBLY RH |
| NG |
 | REPLACE OUTER REAR VIEW MIRROR ASSEMBLY RH |
Operation Check
OPERATION CHECK
CHECK ELECTRICAL REMOTE CONTROL MIRROR FUNCTION
(a) Turn the power switch on (IG).
(b)
With the mirror select switch L switch on, check that the outer rear
view mirror assembly LH surface moves up, down, left and right normally.
(c)
With the mirror select switch R switch on, check that the outer rear
view mirror assembly RH surface moves up, down, left and right normally.
CHECK MEMORY AND REACTIVATION FUNCTION
HINT:
The SET, M1 and M2 seat memory switches are shown in the illustration.
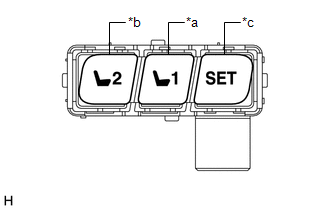
|
*a | M1 Switch |
|
*b | M2 Switch |
|
*c | SET Switch |
(a) Turn the power switch on (IG) and move the shift lever to P.
(b) Check the M1 switch.
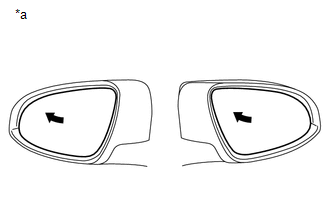
|
*a | Turn to Fully Left Position |
(1) Using the outer mirror switch assembly, turn the mirror surface to the fully left position.
(2)
Check that the buzzer sounds for 0.5 seconds and the seat and mirror
surface position is memorized when the M1 switch is pressed within 3
seconds of the SET switch being pressed.
NOTICE:
- The mirror surface position will also be memorized when the M1 switch is
pressed after first pressing and holding the SET switch.
- The mirror surface position will not be memorized when the SET switch and M1 switch are pressed simultaneously.
- The mirror surface position will not be memorized when 2 or more of the
memory switches are pressed simultaneously (for example, M1 and M2)
after first pressing the SET switch.
(3) Using the outer mirror switch assembly, turn the mirror surface to the fully right position.
(4) Press the M1 switch.
(5)
Check that the buzzer sounds for 0.1 seconds and the mirror surface
automatically moves to the memorized fully left position.
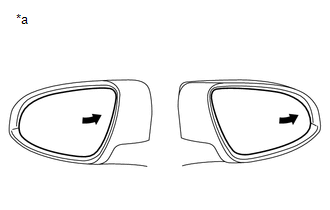
|
*a | Turn to Fully Right Position |
(c) Check the M2 switch.
(1) Using the outer mirror switch assembly, turn the mirror surface to the fully right position.
(2)
Check that the buzzer sounds for 0.5 seconds and the seat and mirror
surface position is memorized when the M2 switch is pressed within 3
seconds of the SET switch being pressed.
NOTICE:
- The mirror surface position will also be memorized when the M2 switch is
pressed after first pressing and holding the SET switch.
- The mirror surface position will not be memorized when the SET switch and M2 switch are pressed simultaneously.
- The mirror surface position will not be memorized when 2 or more of the
memory switches are pressed simultaneously (for example, M1 and M2)
after first pressing the SET switch.
(3) Using the outer mirror switch assembly, turn the mirror surface to the fully left position.
(4) Press the M2 switch.
(5)
Check that the buzzer sounds for 0.1 seconds and the mirror surface
automatically moves to the memorized fully right position.
CHECK MEMORY CALL FUNCTION
(a) Memory call function check
(1)
With an electrical key transmitter sub-assembly recognition code
registered, perform a wireless door unlock operation and check that
opening the driver door causes the following:
- The buzzer sounds for 0.1 seconds.
- The driver seat and mirror surface positions automatically move to the memorized positions.
HINT:
- The registered electrical key transmitter sub-assembly recognition code is recalled automatically.
- If the memory call function is not operated, the buzzer will not sound.
(b) With the power switch on (IG)
and the driver door closed, press and hold the M1 or M2 switch while
carrying the electrical key transmitter sub-assembly. The main body ECU
(multiplex network body ECU) will enter electrical key transmitter
sub-assembly recognition code registration mode to allow a key to be
linked to mirror surface memory position.
HINT:
If
the seat memory switch is released before entering registration mode,
the main body ECU (multiplex network body ECU) will not enter
registration mode.
(c) When the manual door lock switch is pressed, check that the buzzer sounds once (0.5 seconds).
(d)
With the power switch on (IG) and the driver door closed, press and
hold the SET switch while carrying the electrical key transmitter
sub-assembly. The main body ECU (multiplex network body ECU) will enter
electrical key transmitter sub-assembly recognition code deletion mode.
HINT:
If
the seat memory switch is released before entering deletion mode, the
main body ECU (multiplex network body ECU) will not enter deletion mode.
(e) When the manual door lock switch is pressed, check that the buzzer sounds twice (0.1 seconds each time).
CHECK MEMORY CALL EMERGENCY STOP FUNCTION
(a)
While a memory call function is operating, check that any one of the
following actions will stop the memory call operation: 1) pressing the
SET, M1 or M2 switch, 2) moving the shift lever to R, 3) moving the
mirror surface manually, or 4) moving the mirror surface to the
uppermost, lowermost, leftmost or rightmost position.
CHECK MIRROR HEATER FUNCTION
(a) Turn the power switch on (IG).
(b)
Check that pressing the mirror heater switch (rear window defogger
switch) illuminates the indicator and warms the mirror surfaces.
(c) Check that after approximately 15 minutes, the indicator light turns off and the mirror heaters deactivate.
CHECK AUTOMATIC GLARE-RESISTANT EC MIRROR FUNCTION
(a)
Check that the automatic glare-resistant EC mirror function of the
outer rear view mirror assemblies operates when the automatic
glare-resistant function of the inner rear view mirror assembly
operaties.
Parts Location
PARTS LOCATION
ILLUSTRATION
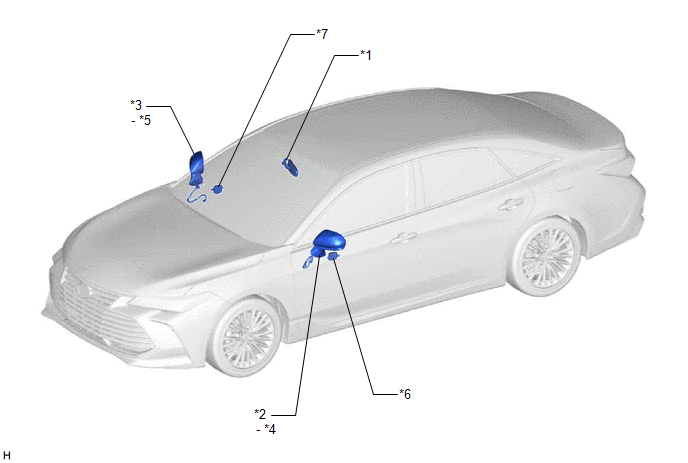
|
*1 | INNER REAR VIEW MIRROR ASSEMBLY |
*2 | OUTER REAR VIEW MIRROR ASSEMBLY LH |
|
*3 | OUTER REAR VIEW MIRROR ASSEMBLY RH |
*4 | OUTER MIRROR LH |
|
*5 | OUTER MIRROR RH |
*6 | OUTER MIRROR CONTROL ECU ASSEMBLY LH |
|
*7 | OUTER MIRROR CONTROL ECU ASSEMBLY RH |
- | - |
ILLUSTRATION
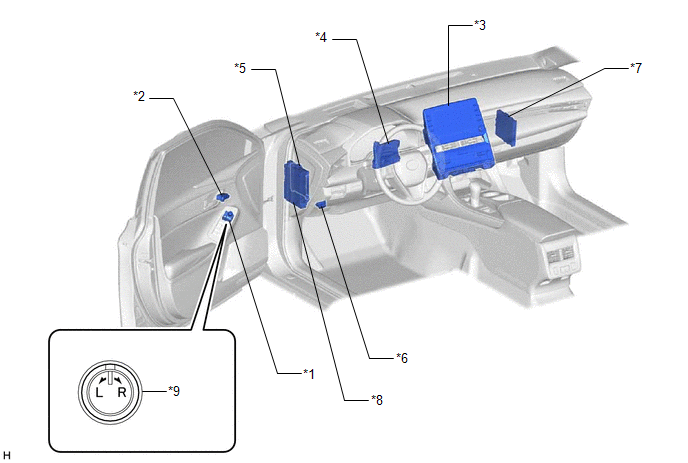
|
*1 | OUTER MIRROR SWITCH ASSEMBLY |
*2 | SEAT MEMORY SWITCH |
|
*3 | REAR WINDOW DEFOGGER SWITCH (RADIO AND DISPLAY RECEIVER ASSEMBLY) |
*4 | AIR CONDITIONING AMPLIFIER ASSEMBLY |
|
*5 | MAIN BODY ECU (MULTIPLEX NETWORK BODY ECU) |
*6 | DLC3 |
|
*7 | CERTIFICATION ECU (SMART KEY ECU ASSEMBLY) |
*8 | INSTRUMENT PANEL JUNCTION BLOCK ASSEMBLY
- DOOR F/R FUSE - DOOR F/L FUSE - ECU-IG1 NO. 4 FUSE
- ECU-DCC NO. 2 FUSE |
|
*9 | MIRROR SELECT AND SURFACE ADJUST SWITCH |
- | - |
Power Mirror cannot be Adjusted with Power Mirror Switch
DESCRIPTION
The outer
mirror switch assembly sends the mirror adjust switch signals to the
main body ECU (multiplex network body ECU). The main body ECU (multiplex
network body ECU) then sends the received mirror adjust switch signals
to each outer mirror control ECU assembly via CAN communication. Based
on this signal, each outer mirror control ECU assembly operates the
vertical and horizontal mirror motors to adjust the mirror surface
position.
WIRING DIAGRAM
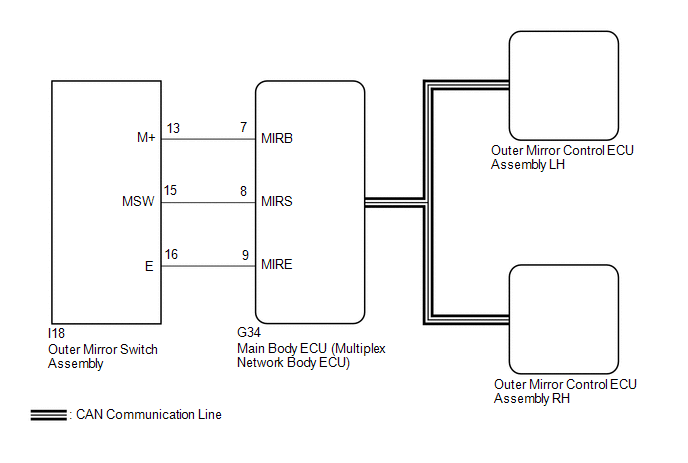
CAUTION / NOTICE / HINT
NOTICE:
- The power mirror control system (w/ Memory) uses the CAN communication
system. Inspect the communication functions by following How to Proceed
with Troubleshooting. Troubleshoot the power mirror control system (w/
Memory) after confirming that the communication systems are functioning
properly.
Click here 
- Before replacing the main body ECU (multiplex network body ECU), refer to Registration.
Click here 
PROCEDURE
|
1. | READ VALUE USING TECHSTREAM |
(a) Connect the Techstream to the DLC3.
(b) Turn the power switch on (IG).
(c) Turn the Techstream on.
(d) Enter the following menus: Body Electrical / Main Body / Data List.
(e) Read the Data List according to the display on the Techstream.
Body Electrical > Main Body > Data List
|
Tester Display | Measurement Item |
Range | Normal Condition |
Diagnostic Note |
|
Mirror Selection SW (R) |
Mirror select switch signal for RH mirror |
OFF or ON | OFF: Mirror select switch off
ON: Mirror select switch R switch on |
- |
| Mirror Selection SW (L) |
Mirror select switch signal for LH mirror |
OFF or ON | OFF: Mirror select switch off
ON: Mirror select switch L switch on |
- |
| Mirror Position SW (R) |
Mirror adjust switch signal (Right) |
OFF or ON | OFF: Mirror adjust switch not pushed right
ON: Mirror adjust switch pushed right |
Check with the mirror select switch L or R selected |
|
Mirror Position SW (L) |
Mirror adjust switch signal (Left) |
OFF or ON | OFF: Mirror adjust switch not pushed left
ON: Mirror adjust switch pushed left |
Check with the mirror select switch L or R selected |
|
Mirror Position SW (Up) |
Mirror adjust switch signal (Up) |
OFF or ON | OFF: Mirror adjust switch not pushed up
ON: Mirror adjust switch pushed up |
Check with the mirror select switch L or R selected |
|
Mirror Position SW (Dwn) |
Mirror adjust switch signal (Down) |
OFF or ON | OFF: Mirror adjust switch not pushed down
ON: Mirror adjust switch pushed down |
Check with the mirror select switch L or R selected |
Body Electrical > Main Body > Data List
|
Tester Display |
| Mirror Selection SW (R) |
|
Mirror Selection SW (L) |
|
Mirror Position SW (R) |
|
Mirror Position SW (L) |
|
Mirror Position SW (Up) |
|
Mirror Position SW (Dwn) |
OK:
On the Techstream screen, ON or OFF is displayed accordingly.
| OK |
 | REPLACE MAIN BODY ECU (MULTIPLEX NETWORK BODY ECU) |
|
NG |
 | |
| 2. |
INSPECT OUTER MIRROR SWITCH ASSEMBLY |
(a) Remove the outer mirror switch assembly.
Click here 
(b) Inspect the outer mirror switch assembly.
Click here 
| NG |
 | REPLACE OUTER MIRROR SWITCH ASSEMBLY |
|
OK |
 | |
| 3. |
CHECK HARNESS AND CONNECTOR (OUTER MIRROR SWITCH ASSEMBLY - MAIN BODY ECU (MULTIPLEX NETWORK BODY ECU)) |
(a) Disconnect the I18 outer mirror switch assembly.
(b) Disconnect the G34 main body ECU (multiplex network body ECU).
(c) Measure the resistance according to the value(s) in the table below.
Standard Resistance:
|
Tester Connection | Condition |
Specified Condition |
|
I18-16 (E) - G34-9 (MIRE) |
Always | Below 1 Ω |
|
I18-13 (M+) - G34-7 (MIRB) |
Always | Below 1 Ω |
|
I18-15 (MSW) - G34-8 (MIRS) |
Always | Below 1 Ω |
|
I18-16 (E) or G34-9 (MIRE) - Body ground |
Always | 10 kΩ or higher |
|
I18-13 (M+) or G34-7 (MIRB) - Body ground |
Always | 10 kΩ or higher |
|
I18-15 (MSW) or G34-8 (MIRS) - Body ground |
Always | 10 kΩ or higher |
| OK |
 | REPLACE MAIN BODY ECU (MULTIPLEX NETWORK BODY ECU) |
| NG |
 | REPAIR OR REPLACE HARNESS OR CONNECTOR |
Power Mirror Surface Position is not Memorized
DESCRIPTION
If any of the
M1 or M2 seat memory switch is pressed, the outer mirror control ECU
assembly LH detects the switch operation and sends the seat memory
switch signal to the main body ECU (multiplex network body ECU) via CAN
communication. On receiving the seat memory switch signal, the main body
ECU (multiplex network body ECU) sends the memory request signal to
each outer mirror control ECU assembly via CAN communication. When
receiving this signal, each outer mirror control ECU assembly stores the
mirror surface position based on information from the mirror position
sensor, which is built into the outer rear view mirror assembly.
WIRING DIAGRAM
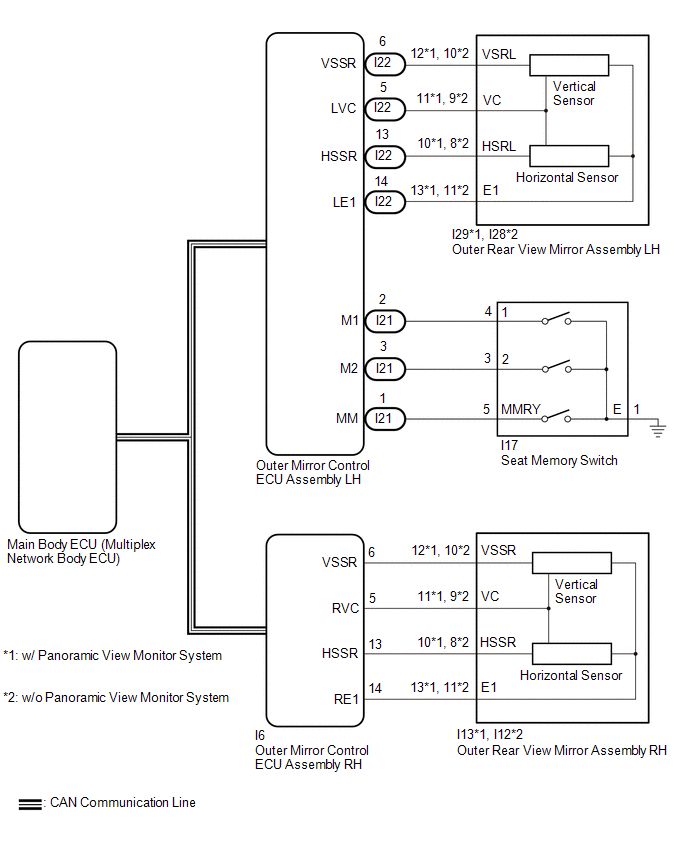
CAUTION / NOTICE / HINT
NOTICE:
- The power mirror control system (w/ Memory) uses the CAN communication
system. First, confirm that there is no malfunction in the CAN
communication system. Refer to the How to Proceed with Troubleshooting
procedure.
Click here 
- Before replacing the main body ECU (multiplex network body ECU), refer to Registration.
Click here 
- The mirror surface position will not be memorized if the power switch is not on (IG).
- The mirror surface position will not be stored if the seat memory SET
switch and 2 or more seat memory switches are pressed simultaneously.
- If the operation fails, the mirror surface position will not be
memorized until the seat memory SET switch is released and the operation
is attempted again.
- The mirror surface position will not be memorized when the mirror is operated manually.
HINT:
Each outer rear view mirror assembly has a built-in mirror vertical position sensor and mirror horizontal position sensor.
PROCEDURE
| 1. |
READ VALUE USING TECHSTREAM |
(a) Connect the Techstream to the DLC3.
(b) Turn the power switch on (IG).
(c) Turn the Techstream on.
(d) Enter the following menus: Body Electrical / Mirror L or Mirror R / Data List.
(e) Read the Data List according to the display on the Techstream.
Body Electrical > Mirror L > Data List
|
Tester Display | Measurement Item |
Range | Normal Condition |
Diagnostic Note |
|
Seat Memory Switch1 | Seat memory switch M1 switch signal |
OFF or ON | OFF: Seat memory switch M1 switch off
ON: Seat memory switch M1 switch on |
- |
| Seat Memory Switch2 |
Seat memory switch M2 switch signal |
OFF or ON | OFF: Seat memory switch M2 switch off
ON: Seat memory switch M2 switch on |
- |
| Seat Memory Set SW |
Seat memory switch SET switch signal |
OFF or ON | OFF: Seat memory switch SET switch off
ON: Seat memory switch SET switch on |
- |
Body Electrical > Mirror L > Data List
|
Tester Display |
| Seat Memory Switch1 |
|
Seat Memory Switch2 |
|
Seat Memory Set SW |
Body Electrical > Mirror R > Data List
|
Tester Display | Measurement Item |
Range | Normal Condition |
Diagnostic Note |
|
Seat Memory Switch1 | Seat memory switch M1 switch signal |
OFF or ON | OFF: Seat memory switch M1 switch off
ON: Seat memory switch M1 switch on |
- |
| Seat Memory Switch2 |
Seat memory switch M2 switch signal |
OFF or ON | OFF: Seat memory switch M2 switch off
ON: Seat memory switch M2 switch on |
- |
| Seat Memory Set SW |
Seat memory switch SET switch signal |
OFF or ON | OFF: Seat memory switch SET switch off
ON: Seat memory switch SET switch on |
- |
Body Electrical > Mirror R > Data List
|
Tester Display |
| Seat Memory Switch1 |
|
Seat Memory Switch2 |
|
Seat Memory Set SW |
OK:
On the Techstream screen, ON or OFF is displayed accordingly.
| NG |
 | GO TO STEP 8 |
|
OK |
 | |
| 2. |
CHECK SEAT MEMORY SWITCH (SEAT POSITION MEMORY FUNCTION) |
(a) When any seat memory switch (M1 or M2) is pressed, check that the driver seat moves to the memorized position.
Click here 
OK:
The driver seat moves to the memorized position.
| NG |
 | GO TO FRONT POWER SEAT CONTROL SYSTEM (Power Seat does not Return to Memorized Position) |
|
OK |
 | |
| 3. |
CHECK MEMORY AND REACTIVATION FUNCTION |
| (a) Turn the power switch on (IG). |
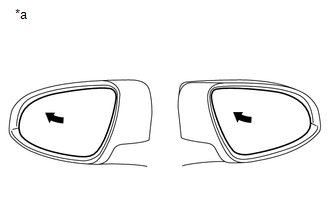 |
|
*a | Turn to Fully Left Position | | |
(b) Using the outer mirror switch assembly, turn the mirror surface to the fully left position.
(c) Press the M1 switch while the SET switch is being pressed.
(d) Check that the buzzer sounds for 0.5 seconds and the mirror surface position is memorized.
(e) Using the outer mirror switch assembly, turn the mirror surface to the fully right position.
(f) Press the M1 switch.
(g) Check that the buzzer sounds for 0.1 seconds and the outer mirror automatically moves to the memorized fully left position.
| Result |
Proceed to |
| Memory and reactivation functions on both mirrors are not normal |
A |
| Memory and reactivation functions on driver door mirror are not normal |
B |
| Memory and reactivation functions on front passenger door mirror are not normal |
C |
| A |
 | REPLACE MAIN BODY ECU (MULTIPLEX NETWORK BODY ECU) |
| C |
 | GO TO STEP 6 |
|
B |
 | |
| 4. |
REPLACE OUTER REAR VIEW MIRROR ASSEMBLY LH |
(a) Temporarily replace the outer rear view mirror assembly LH with a new or known good one.
Click here 
|
NEXT |
 | |
| 5. |
CHECK MEMORY AND REACTIVATION FUNCTION |
| (a) Turn the power switch on (IG). |
 |
|
*a | Turn to Fully Left Position | | |
(b) Using the outer mirror switch assembly, turn the mirror surface to the fully left position.
(c) Press the M1 switch while the SET switch is being pressed.
(d) Check that the buzzer sounds for 0.5 seconds and the mirror surface position is memorized.
(e) Using the outer mirror switch assembly, turn the mirror surface to the fully right position.
(f) Press the M1 switch.
(g) Check that the buzzer sounds for 0.1 seconds and the outer mirror automatically moves to the memorized fully left position.
| OK |
 | END (OUTER REAR VIEW MIRROR ASSEMBLY LH WAS DEFECTIVE) |
| NG |
 | REPLACE OUTER MIRROR CONTROL ECU ASSEMBLY LH |
| 6. |
REPLACE OUTER REAR VIEW MIRROR ASSEMBLY RH |
(a) Temporarily replace the outer rear view mirror assembly RH with a new or known good one.
Click here 
|
NEXT |
 | |
| 7. |
CHECK MEMORY AND REACTIVATION FUNCTION |
| (a) Turn the power switch on (IG). |
 |
|
*a | Turn to Fully Left Position | | |
(b) Using the outer mirror switch assembly, turn the mirror surface to the fully left position.
(c) Press the M1 switch while the SET switch is being pressed.
(d) Check that the buzzer sounds for 0.5 seconds and the mirror surface position is memorized.
(e) Using the outer mirror switch assembly, turn the mirror surface to the fully right position.
(f) Press the M1 switch.
(g) Check that the buzzer sounds for 0.1 seconds and the outer mirror automatically moves to the memorized fully left position.
| OK |
 | END (OUTER REAR VIEW MIRROR ASSEMBLY RH WAS DEFECTIVE) |
| NG |
 | REPLACE OUTER MIRROR CONTROL ECU ASSEMBLY RH |
| 8. |
INSPECT SEAT MEMORY SWITCH |
(a) Remove the seat memory switch.
Click here 
(b) Inspect the seat memory switch.
Click here 
| NG |
 | REPLACE SEAT MEMORY SWITCH |
|
OK |
 | |
| 9. |
CHECK HARNESS AND CONNECTOR (SEAT MEMORY SWITCH - OUTER MIRROR CONTROL ECU ASSEMBLY LH - BODY GROUND) |
(a) Disconnect the I21 outer mirror control ECU assembly LH connector.
(b) Disconnect the I17 seat memory switch connector.
(c) Measure the resistance according to the value(s) in the table below.
Standard Resistance:
|
Tester Connection | Condition |
Specified Condition |
|
I21-1 (MM) - I17-5 (MMRY) |
Always | Below 1 Ω |
|
I21-1 (MM) or I17-5 (MMRY) - Body ground |
Always | 10 kΩ or higher |
|
I21-2 (M1) - I17-4 (1) |
Always | Below 1 Ω |
|
I21-2 (M1) or I17-4 (1) - Body ground |
Always | 10 kΩ or higher |
|
I21-3 (M2) - I17-3 (2) |
Always | Below 1 Ω |
|
I21-3 (M2) or I17-3 (2) - Body ground |
Always | 10 kΩ or higher |
|
I17-1 (E) - Body ground |
Always | Below 1 Ω |
| OK |
 | REPLACE OUTER MIRROR CONTROL ECU ASSEMBLY LH |
| NG |
 | REPAIR OR REPLACE HARNESS OR CONNECTOR |
Power Mirrors do not Return to Memorized Position
DESCRIPTION
If any of the
M1 or M2 seat memory switch is pressed, the outer mirror control ECU
assembly LH detects the switch operation and sends the seat memory
switch signal to the main body ECU (multiplex network body ECU) via CAN
communication. The main body ECU (multiplex network body ECU) sends the
reproduction signal to each outer mirror control ECU assembly via CAN
communication. When receiving the reproduction signal, each outer mirror
control ECU assembly operates the vertical and horizontal mirror
motors, which are built into the outer rear view mirror assembly, to
adjust the mirror surface to the stored position.
WIRING DIAGRAM
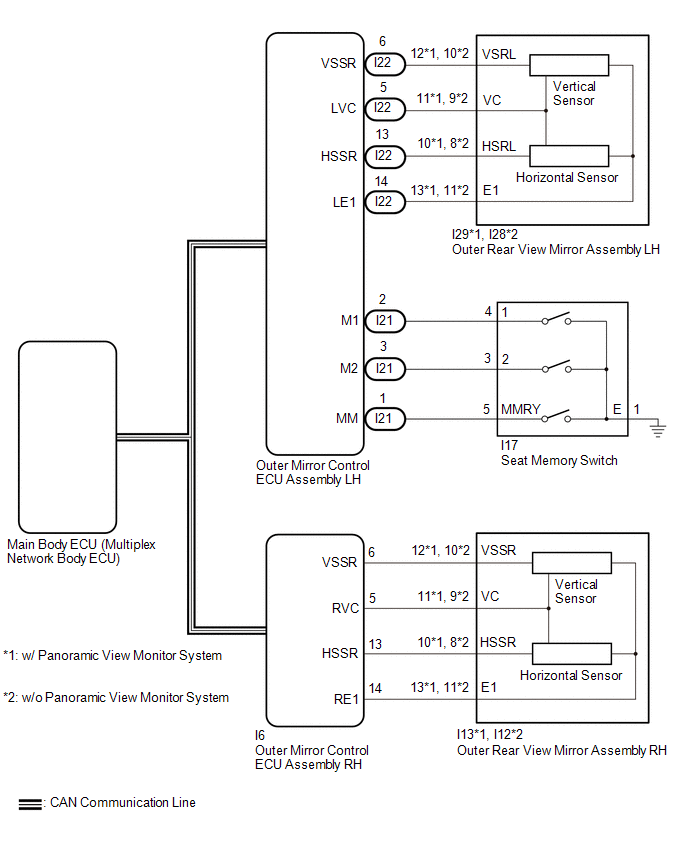
CAUTION / NOTICE / HINT
NOTICE:
- The power mirror control system (w/ Memory) uses the CAN communication
system. First, confirm that there is no malfunction in the CAN
communication system. Refer to the How to Proceed with Troubleshooting
procedure.
Click here 
- Before replacing the main body ECU (multiplex network body ECU), refer to Registration.
Click here 
PROCEDURE
|
1. | CHECK SEAT MEMORY SWITCH FUNCTION |
(a) When any seat memory switch (M1 or M2) is pressed, check that the driver seat moves to the memorized position.
Click here 
OK:
Driver seat moves to the memorized position.
| NG |
 | GO TO FRONT POWER SEAT CONTROL SYSTEM (Power Seat does not Return to Memorized Position) |
|
OK |
 | |
| 2. |
CHECK ELECTRICAL REMOTE CONTROL MIRROR FUNCTION |
(a) Check the electrical remote control mirror function.
Click here

OK:
Electrical remote control mirror function is normal.
| NG |
 | GO TO OTHER DIAGNOSTIC PROCEDURE (Power Mirror cannot be Adjusted with Power Mirror Switch) |
|
OK |
 | |
| 3. |
READ VALUE USING TECHSTREAM |
(a) Connect the Techstream to the DLC3.
(b) Turn the power switch on (IG).
(c) Turn the Techstream on.
(d) Enter the following menus: Body Electrical / Mirror L or Mirror R / Data List.
(e) Read the Data List according to the display on the Techstream.
Body Electrical > Mirror L > Data List
|
Tester Display | Measurement Item |
Range | Normal Condition |
Diagnostic Note |
|
Mirror Memory No.1 | Mirror position memorized in memory switch M1 |
OFF or ON | OFF: Not memorized
ON: Memorized | - |
|
Mirror Memory No.2 | Mirror position memorized in memory switch M2 |
OFF or ON | OFF: Not memorized
ON: Memorized | - |
Body Electrical > Mirror L > Data List
|
Tester Display |
| Mirror Memory No.1 |
|
Mirror Memory No.2 |
Body Electrical > Mirror R > Data List
|
Tester Display | Measurement Item |
Range | Normal Condition |
Diagnostic Note |
|
Mirror Memory No.1 | Mirror position memorized in memory switch M1 |
OFF or ON | OFF: Not memorized
ON: Memorized | - |
|
Mirror Memory No.2 | Mirror position memorized in memory switch M2 |
OFF or ON | OFF: Not memorized
ON: Memorized | - |
Body Electrical > Mirror R > Data List
|
Tester Display |
| Mirror Memory No.1 |
|
Mirror Memory No.2 |
OK:
ON (Memorized) appears on the screen.
| NG |
 | GO TO OTHER DIAGNOSTIC PROCEDURE (Power Mirror Surface Position is not Memorized) |
|
OK |
 | |
| 4. |
CHECK MEMORY AND REACTIVATION FUNCTION |
| (a) Turn the power switch on (IG). |
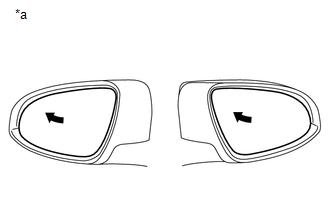 |
|
*a | Turn to Fully Left Position | | |
(b) Using the outer mirror switch assembly, turn the mirror surface to the fully left position.
(c) Press the M1 switch while the SET switch is being pressed.
(d) Check that the buzzer sounds for 0.5 seconds and the mirror surface position is memorized.
(e) Using the outer mirror switch assembly, turn the mirror surface to the fully right position.
(f) Press the M1 switch.
(g) Check that the buzzer sounds for 0.1 seconds and the outer mirror automatically moves to the memorized fully left position.
| Result |
Proceed to |
| Memory and reactivation functions on both mirrors are not normal |
A |
| Memory and reactivation function on driver door mirror is not normal |
B |
| Memory and reactivation function on front passenger door mirror is not normal |
C |
| A |
 | REPLACE MAIN BODY ECU (MULTIPLEX NETWORK BODY ECU) |
| C |
 | GO TO STEP 7 |
|
B |
 | |
| 5. |
REPLACE OUTER REAR VIEW MIRROR ASSEMBLY LH |
(a) Temporarily replace the outer rear view mirror assembly LH with a new or known good one.
Click here 
|
NEXT |
 | |
| 6. |
CHECK MEMORY AND REACTIVATION FUNCTION |
| (a) Turn the power switch on (IG). |
 |
|
*a | Turn to Fully Left Position | | |
(b) Using the outer mirror switch assembly, turn the mirror surface to the fully left position.
(c) Press the M1 switch while the SET switch is being pressed.
(d) Check that the buzzer sounds for 0.5 seconds and the mirror surface position is memorized.
(e) Using the outer mirror switch assembly, turn the mirror surface to the fully right position.
(f) Press the M1 switch.
(g) Check that the buzzer sounds for 0.1 seconds and the outer mirror automatically moves to the memorized fully left position.
| OK |
 | END (OUTER REAR VIEW MIRROR ASSEMBLY LH WAS DEFECTIVE) |
| NG |
 | REPLACE OUTER MIRROR CONTROL ECU ASSEMBLY LH |
| 7. |
REPLACE OUTER REAR VIEW MIRROR ASSEMBLY RH |
(a) Temporarily replace the outer rear view mirror assembly RH with a new or known good one.
Click here 
|
NEXT |
 | |
| 8. |
CHECK MEMORY AND REACTIVATION FUNCTION |
| (a) Turn the power switch on (IG). |
 |
|
*a | Turn to Fully Left Position | | |
(b) Using the outer mirror switch assembly, turn the mirror surface to the fully left position.
(c) Press the M1 switch while the SET switch is being pressed.
(d) Check that the buzzer sounds for 0.5 seconds and the mirror surface position is memorized.
(e) Using the outer mirror switch assembly, turn the mirror surface to the fully right position.
(f) Press the M1 switch.
(g) Check that the buzzer sounds for 0.1 seconds and the outer mirror automatically moves to the memorized fully left position.
| OK |
 | END (OUTER REAR VIEW MIRROR ASSEMBLY RH WAS DEFECTIVE) |
| NG |
 | REPLACE OUTER MIRROR CONTROL ECU ASSEMBLY RH |
Precaution
PRECAUTION
PRECAUTION FOR DISCONNECTING CABLE FROM NEGATIVE AUXILIARY BATTERY TERMINAL
NOTICE:
When
disconnecting the cable from the negative (-) auxiliary battery
terminal, initialize the following systems after the cable is
reconnected.
|
System Name | See Procedure |
|
Lane Departure Alert System (w/ Steering Control) |
 |
|
Intelligent Clearance Sonar System |
|
Parking Assist Monitor System |
|
Panoramic View Monitor System |
|
Pre-collision System |
|
Lighting System (for HV Model with Cornering Light) |
Problem Symptoms Table
PROBLEM SYMPTOMS TABLE
NOTICE:
If the battery voltage is low, the mirror heater function may not operate.
HINT:
- Use the table below to help determine the cause of problem symptoms. If
multiple suspected areas are listed, the potential causes of the
symptoms are listed in order of probability in the "Suspected Area"
column of the table. Check each symptom by checking the suspected areas
in the order they are listed. Replace parts as necessary.
- Inspect the fuses and relays related to this system before inspecting the suspected areas below.
Power Mirror Control System (w/ Memory) |
Symptom | Suspected Area |
Link |
| Driver side power mirror cannot be adjusted with power mirror switch |
Proceed to "Driver Side Power Mirror cannot be Adjusted with Power Mirror Switch" |
 |
|
Front passenger side power mirror cannot be adjusted with power mirror switch |
Proceed to "Front Passenger Side Power Mirror cannot be Adjusted with Power Mirror Switch" |
 |
|
Power mirror cannot be adjusted with power mirror switch |
Proceed to "Power Mirror cannot be Adjusted with Power Mirror Switch" |
 |
|
Mirror heater does not operate with rear defogger switch |
Proceed to "Mirror Heater does not Operate with Rear Defogger Switch" |
 |
|
Power
mirror surface position is not memorized (Registration operation that
does not use wireless or smart key is not functioning) |
Proceed to "Power Mirror Surface Position is not Memorized" |
 |
|
Power mirrors do not return to memorized position (Recall operation that does not use wireless or smart key is not functioning) |
Proceed to "Power Mirrors do not Return to Memorized Position" |
 |
|
Wireless
transmitter memory function does not operate (Registration operation
that uses wireless or smart key is not functioning) |
Smart key system (for Entry Function, HV Model) |
 |
|
Wireless door lock control system (for HV Model) |
 |
|
Front power seat control system (for HV Model with Memory) |
 |
|
Main body ECU (Multiplex network body ECU) |
 |
|
Wireless-linked return function does not operate (Recall operation that uses wireless or smart key is not functioning) |
Smart key system (for Entry Function, HV Model) |
 |
|
Wireless door lock control system (for HV Model) |
 |
|
Front power seat control system (for HV Model with Memory) |
 |
|
Main body ECU (Multiplex network body ECU) |
 |
|
Automatic glare-resistant EC mirror does not operate |
Inner rear view mirror assembly |
 |
|
Outer rear view mirror assembly LH |
- |
| Outer rear view mirror assembly RH |
- |
| Wire harness or connector |
- |
System Description
SYSTEM DESCRIPTION
POWER MIRROR CONTROL SYSTEM (w/ Memory) DESCRIPTION
(a)
This system has the following functions: electrical remote control
mirror function, memory and reactivation function, mirror heater
function and automatic glare-resistant EC mirror function.
FUNCTION OF MAIN COMPONENT
|
Component | Function |
|
Outer rear view mirror assembly |
Vertical mirror motor | Receives a signal from the outer mirror control ECU assembly and adjusts the mirror surface position vertically. |
|
Horizontal mirror motor | Receives a signal from the outer mirror control ECU assembly and adjusts the mirror surface position horizontally. |
|
Mirror position sensor | Detects the mirror surface position. This information is sent to the outer mirror control ECU assembly. |
|
Mirror heater | Receives a signal from the outer mirror control ECU assembly and operates the mirror heaters. |
|
EC mirror cell | Varies the reflection rate of the mirror through the function of EC elements. |
|
Outer mirror switch assembly |
Mirror select switch | Consists of individual R and L switches. One must be selected to operate the mirror adjust switch. |
|
Mirror adjust switch | Mirror R and L signals are sent to each outer mirror control ECU assembly from the mirror select switch.
After
selecting the R or L switch, the right, left, up and down control
switches can be operated to change the angle of the mirror surface. |
|
Seat memory switch | When
the seat memory M1 or M2 switch is pressed while the SET switch is
being pressed, or the M1 or M2 switch is pressed within 3 seconds of the
SET switch being pressed, a signal is sent to the outer mirror control
ECU assembly LH, which records the mirror surface position. When
the seat memory switch is pressed, a signal is sent to the outer mirror
control ECU assembly LH and sent to the main body ECU (multiplex
network body ECU), which changes the mirror surface position to the
memorized position. |
|
Outer mirror control ECU assembly | Operates each mirror motor based on signals from the mirror select switch and mirror adjust switch.
Based
on information from the mirror position sensors, 2 different mirror
surface positions can be memorized. By operating a seat memory switch,
the mirror surface moves to the memorized position. |
SYSTEM OPERATION
(a) The power mirror control system (w/ Memory) has the following features.
|
Function | Outline |
|
Electrical remote control mirror function |
When
the outer mirror switch assembly is operated, this function moves the
mirror surface vertically or horizontally to enable the driver to attain
an optimal mirror angle. Pressing the mirror select switch R switch
operates the right side mirror, and pressing the mirror select switch L
switch operates the left side mirror. |
|
Memory and reactivation function | Stores the adjusted mirror surface position in the outer mirror control ECU assembly. |
|
Mirror heater function |
Turns
on the mirror heaters when the rear window defogger is turned on. The
rear window defogger and mirror heaters automatically turn off 15
minutes after the rear window defogger and mirror heaters were
activated. |
| Automatic glare-resistant EC mirror function |
Reduces glare/reflection in the mirror during nighttime driving for safer driving conditions.
Glare/reflection from vehicle headlights behind could blind the driver and cause dangerous driving conditions. |
System Diagram
SYSTEM DIAGRAM
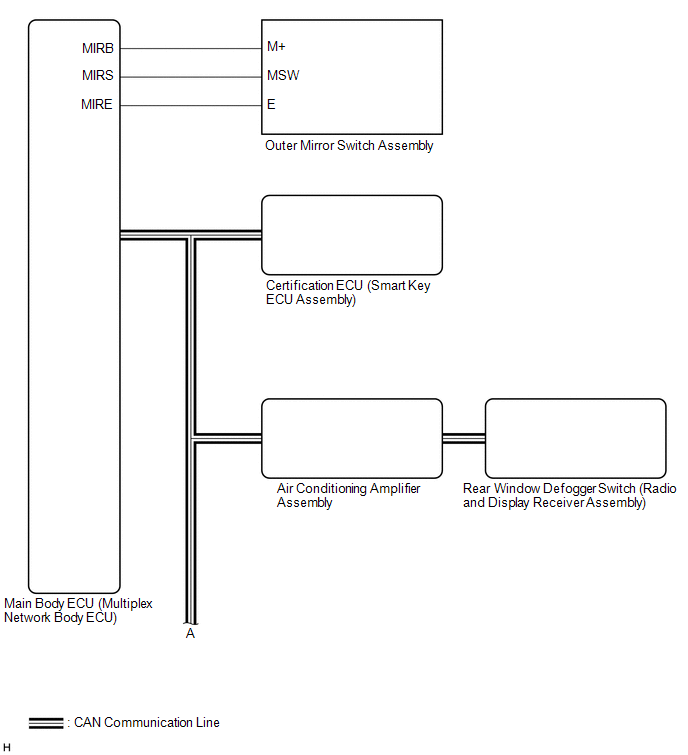
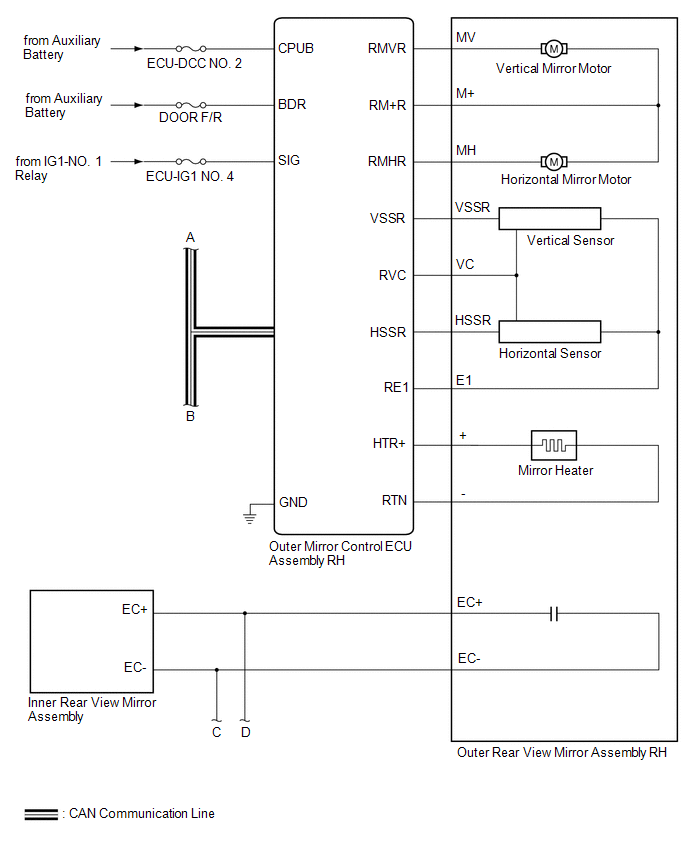
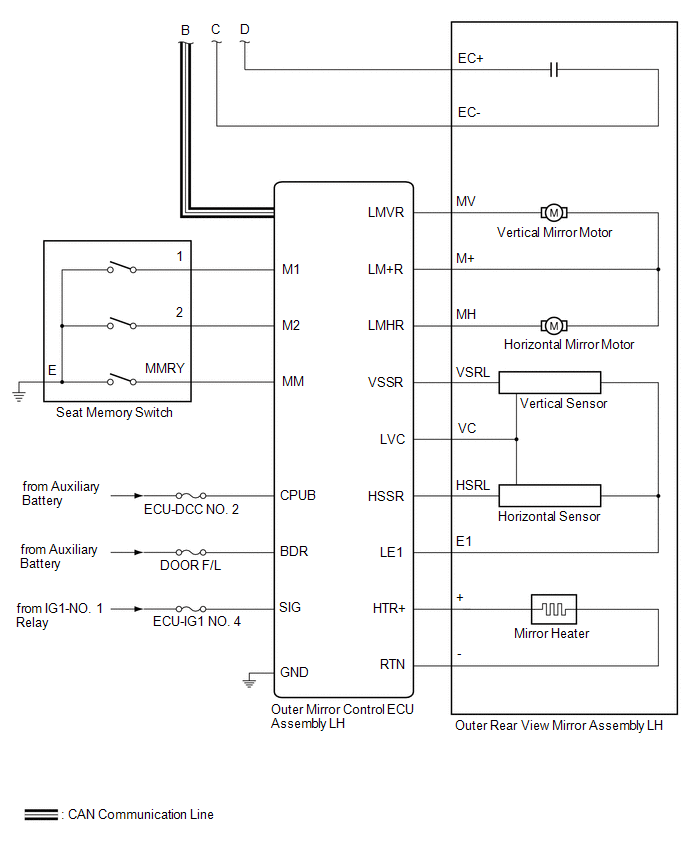 Communication Table
 |
Sender | Receiver |
Signal | Line |
|
Air Conditioning Amplifier Assembly |
Outer Mirror Control ECU Assembly |
Mirror heater drive request signal |
CAN |
| Main Body ECU (Multiplex Network Body ECU) |
Outer Mirror Control ECU Assembly |
- IG signal
- ACC signal
- Outer mirror switch assembly signal
- Mirror position request signal (seat position memory and reactivation function)
| CAN |
|
Outer Mirror Control ECU Assembly |
Main Body ECU (Multiplex Network Body ECU) |
- Outer mirror state signal
- Seat memory switch signal
| CAN |
|
Certification ECU (Smart Key ECU Assembly) |
Main Body ECU (Multiplex Network Body ECU) |
Key ID signal | CAN |
|
Radio and Display Receiver Assembly |
Air Conditioning Amplifier Assembly |
Mirror heater switch (rear window defogger switch) operation signal |
CAN |
Terminals Of Ecu
TERMINALS OF ECU
CHECK OUTER MIRROR CONTROL ECU ASSEMBLY LH

(a) Disconnect the I21 outer mirror control ECU assembly LH connector.
(b) Measure the voltage and resistance according to the value(s) in the table below.
HINT:
Measure the values on the wire harness side with the connector disconnected.
|
Terminal No. (Symbol) | Wiring Color |
Terminal Description | Condition |
Specified Condition |
|
I21-14 (BDR) - Body ground |
GR - Body ground | +B power supply |
Power switch off | 11 to 14 V |
|
I21-6 (CPUB) - Body ground |
LA-L - Body ground | +B power supply |
Power switch off | 11 to 14 V |
|
I21-5 (SIG) - Body ground |
LA-B - Body ground | Ignition power supply |
Power switch off → on (IG) |
Below 1 V → 11 to 14 V |
|
I21-7 (GND) - Body ground |
W-B - Body ground | Ground |
Always | Below 1 Ω |
(c) Reconnect the I21 outer mirror control ECU assembly LH connector.
(d) Measure the voltage according to the value(s) in the table below.
|
Terminal No. (Symbol) | Wiring Color |
Terminal Description | Condition |
Specified Condition |
|
I22-1 (LMVR) - I22-10 (LM+R) |
BR - V | Vertical mirror motor drive voltage |
Driver door mirror surface moving upward → stopped |
11 to 14 V → Below 1 V |
|
I22-10 (LM+R) - I22-1 (LMVR) |
V - BR | Vertical mirror motor drive voltage |
Driver door mirror surface moving downward → stopped |
11 to 14 V → Below 1 V |
|
I22-10 (LM+R) - I22-9 (LMHR) |
V - LG | Horizontal mirror motor drive voltage |
Driver door mirror surface moving right → stopped |
11 to 14 V → Below 1 V |
|
I22-9 (LMHR) - I22-10 (LM+R) |
LG - V | Horizontal mirror motor drive voltage |
Driver door mirror surface moving left → stopped |
11 to 14 V → Below 1 V |
|
I22-5 (LVC) - I22-14 (LE1) |
G - BR | Mirror position sensor power supply |
Power switch on (IG) |
4.55 to 5.45 V |
|
Power switch off | Below 1 V |
|
I22-6 (VSSR) - I21-7 (GND) |
V - W-B | Mirror position sensor signal |
Power switch on (IG) |
0 to 5 V |
| I22-13 (HSSR) - I21-7 (GND) |
GR - W-B | Mirror position sensor signal |
Power switch on (IG) |
0 to 5 V |
|
I21-3 (M2) - I21-7 (GND) |
R - W-B | M2 switch signal for seat memory switch |
M2 switch on | Below 1 V |
|
M2 switch off | 11 to 14 V |
|
I21-2 (M1) - I21-7 (GND) |
BR - W-B |
M1 switch signal for seat memory switch |
M1 switch on | Below 1 V |
|
M1 switch off | 11 to 14 V |
|
I21-1 (MM) - I21-7 (GND) |
GR - W-B |
SET switch signal for seat memory switch |
SET switch on | Below 1 V |
|
SET switch off | 11 to 14 V |

CHECK OUTER MIRROR CONTROL ECU ASSEMBLY RH
(a) Disconnect the I5 outer mirror control ECU assembly RH connector.
(b) Measure the voltage and resistance according to the value(s) in the table below.
HINT:
Measure the values on the wire harness side with the connector disconnected.
|
Terminal No. (Symbol) | Wiring Color |
Terminal Description | Condition |
Specified Condition |
|
I5-14 (BDR) - Body ground |
GR - Body ground | +B power supply |
Power switch off | 11 to 14 V |
|
I5-6 (CPUB) - Body ground |
LA-L - Body ground | +B power supply |
Power switch off | 11 to 14 V |
|
I5-5 (SIG) - Body ground |
LA-B - Body ground | Ignition power supply |
Power switch off → on (IG) |
Below 1 V → 11 to 14 V |
|
I5-7 (GND) - Body ground |
W-B - Body ground | Ground |
Always | Below 1 Ω |
(c) Reconnect the I5 outer mirror control ECU assembly RH connector.
(d) Measure the voltage according to the value(s) in the table below.
|
Terminal No. (Symbol) | Wiring Color |
Terminal Description | Condition |
Specified Condition |
|
I6-1 (RMVR) - I6-10 (RM+R) |
BR - V | Vertical mirror motor drive voltage |
Front passenger door mirror surface moving upward → stopped |
11 to 14 V → Below 1 V |
|
I6-10 (RM+R) - I6-1 (RMVR) |
V - BR | Vertical mirror motor drive voltage |
Front passenger door mirror surface moving downward → stopped |
11 to 14 V → Below 1 V |
|
I6-10 (RM+R) - I6-9 (RMHR) |
V - LG | Horizontal mirror motor drive voltage |
Front passenger door mirror surface moving right → stopped |
11 to 14 V → Below 1 V |
|
I6-9 (RMHR) - I6-10 (RM+R) |
LG - V | Horizontal mirror motor drive voltage |
Front passenger door mirror surface moving left → stopped |
11 to 14 V → Below 1 V |
|
I6-5 (RVC) - I6-14 (RE1) |
G - BR | Mirror position sensor power supply |
Power switch on (IG) |
4.55 to 5.45 V |
|
Power switch off | Below 1 V |
|
I6-6 (VSSR) - I5-7 (GND) |
V - W-B | Mirror position sensor signal |
Power switch on (IG) |
0 to 5 V |
| I6-13 (HSSR) - I5-7 (GND) |
GR - W-B | Mirror position sensor signal |
Power switch on (IG) |
0 to 5 V |
CHECK MAIN BODY ECU (MULTIPLEX NETWORK BODY ECU) AND INSTRUMENT PANEL JUNCTION BLOCK ASSEMBLY
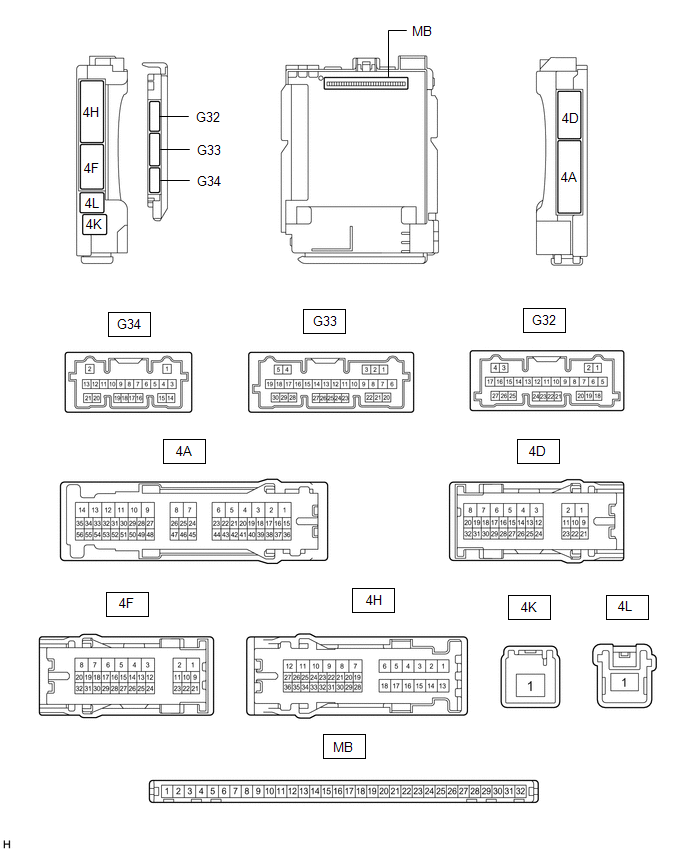
(a) Disconnect the instrument panel junction block assembly and main body ECU (multiplex network body ECU) connectors.
Click here 
(b) Reconnect the instrument panel junction block assembly connectors.
(c) Measure the resistance and voltage according to the value(s) in the table below.
HINT:
Measure the values on the wire harness side with the connector disconnected.
|
Terminal No. (Symbol) | Wiring Color |
Terminal Description | Condition |
Specified Condition |
|
MB-31 (BECU) - Body ground |
- | Auxiliary battery power supply |
Power switch off | 11 to 14 V |
|
MB-32 (IG) - Body ground |
- | Ignition power supply (IG signal) |
Power switch on (IG) |
11 to 14 V |
|
Power switch off | Below 1 V |
|
MB-30 (ACC) - Body ground |
- | Ignition power supply (ACC signal) |
Power switch on (ACC) |
11 to 14 V |
|
Power switch off | Below 1 V |
|
MB-11 (GND1) - Body ground |
- | Ground |
Always | Below 1 Ω |
|
G32-19 (GND2) - Body ground |
W-B - Body ground | Ground |
Always | Below 1 Ω |
(d) Connect the main body ECU (multiplex network body ECU) connectors.
(e) Measure the voltage according to the value(s) in the table below.
|
Tester Connection | Wiring Color |
Terminal Description | Condition |
Specified Condition |
|
G34-7 (MIRB) - G34-9 (MIRE) |
L - W | Mirror surface adjust switch signal |
- Power switch on (ACC)
- Mirror surface adjust switch up
| Below 1.7 V |
- Power switch on (ACC)
- Mirror surface adjust switch right
| Below 2.7 V |
- Power switch on (ACC)
- Mirror surface adjust switch down
| Below 3.5 V |
- Power switch on (ACC)
- Mirror surface adjust switch left
| Below 4 V |
- Power switch on (ACC)
- Mirror surface adjust switch off
| 3.8 to 5 V |
|
G34-8 (MIRS) - G34-9 (MIRE) |
GR - W | Mirror select switch signal |
- Power switch on (ACC)
- Mirror select switch L
| Below 2 V |
- Power switch on (ACC)
- Mirror select switch R
| Below 1 V |
- Power switch on (ACC)
- Mirror select switch off
| 3.8 to 5.0 V |
Lost Communication With Body Control Module "B" (U0142)
DESCRIPTION
|
DTC No. | Detection Item |
DTC Detection Condition | Trouble Area |
|
U0142 | Lost Communication with Main Body ECU |
No communication with main body ECU (multiplex network body ECU) |
- CAN communication system
- Main body ECU (multiplex network body ECU)
|
PROCEDURE
| 1. |
GO TO CAN COMMUNICATION SYSTEM |
HINT:
Refer to CAN Communication System.
Click here

| NEXT |  |
END |


 Communication Table


